Recent Comments
No comments to show.
Posted by admin in Babies 0-6 months, Babies 6 months - 4 years, Breastfeeding, General, How to on May 15th, 2014
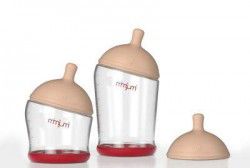
We’re really excited to have been accepted as a stockist of the MIMIJUMI BABY BOTTLES.
Developed by a comprehensive team of Mothers, Nurses, Doctors, Lactation Experts and Industrial Designers finally its here – the perfect baby bottle. With natural colours, textures and forms, Mimijumi baby bottles provide the perfect complement to breastfeeding and the best possible transition to bottle feeding. The innovative nipple design on Mimijumi baby bottles replicate a mother’s breast all the way down to pores on the skin, creating the most natural feeding and latching experience for a happier and healthier bottle fed baby.Functioning like a breast, the non-free-flow nipple design means your baby has to actually latch onto the nipple and suckle in order to produce the milk, just like they do at the breast. These elements combined replicate the breastfeeding experience and provide the most natural bottle feeding experience possible.
Mimijumi baby bottles are easy to open and clean, and are top rack dishwasher safe. Our unique integrated venting system means it is anti-colic and anti gas, and our bottles have a skid-free base for those hard one-handed refills. All Mimijumi baby bottles and parts are produced in Austria with the highest quality standards to protect your baby, and all bottles and parts are BPA Free, Latex Free, EA Free, totally toxin free and exceed all Australian safety standards. Coming in 2 sizes, The Very Hungry Baby Bottle and Not So Hungry Baby Bottle, Mimijumi baby bottles are the Next Breast Thing.
Posted by admin in Babies 6 months - 4 years, Breastfeeding, How to on April 7th, 2014
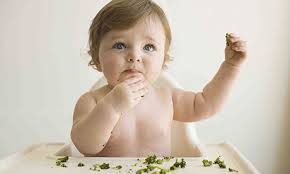
Starting your baby on solids is fun, interesting, sometimes frustrating, sometimes challenging but pretty much always messy!
Current recommendations are to start solids some time after your baby turns 6 months old. Prior to this, the baby’s digestive system is just unable to cope with other foods and their kidneys cannot process salt well. Research suggests that babies who start solids after 6 months are less likely to be intolerant or develop allergies to foods and are less likely to develop obesity and its related health concerns later in life.
Sometimes it is tempting to begin solids in the belief that this may assist your baby in sleeping through the night. It has been researched and found that babies will not automatically sleep for longer periods after being given solids (or formula for that matter).
Babies have a natural tongue-thrust reflex that means their tongue will push out against anything going in. This does disappear by about 6 months of age, enabling babies to accept and swallow solid foods.
Trying to take food from you, chewing on everything she gets her hands on, staring while you eat or appearing unsatisfied after feeds aren’t necessarily signs that your baby is ready for solids. These are all natural, developmentally appropriate behaviours that aren’t particularly related to food.
If your baby is over 6 months and does appear to be unsatisfied, even after days and nights of more frequent feedings, you may like to start considering adding solids to her diet.

Always offer the breast before solids, thus ensuring that she is getting her most important food. This will also help to avoid decreasing your supply. If you do find this is the case, you can just offer more breast, less solids for a few days to boost your supply again. Start with one “meal” per day and you can gradually build from there.
This can get pretty messy so you may like to choose where you feed wisely – if you’re not keen on scrubbing floors, its a good idea to lay down some newspaper or a plastic tablecloth to catch the inevitable spills and dribbles that will occur.
Introduce one food at a time, and space the introduction of new foods to be able to isolate reactions if they occur.
Some babies prefer to feed themselves and can be given their own spoon or if they prefer offer them finger foods they can hang onto and eat themselves.
You may at this time like to start offering a small drink of water to your baby with these meals. If your baby is still able to have as many breastfeeds as she wants, she will get sufficient fluid from your breastmilk so don’t worry if she’s not interested in water at this point.
For some babies it can be a quick transition, others are slower to taking any real interest in solids. Take your time, be guided by your baby and her appetite and try and avoid letting food become a battle.
Bon appetit!

My children always end up with waaaayyy too much chocolate over Easter with some not even eaten but landing in the bin. When they were littlies we would just store it and throw away (or sneakily eat some at night) and ration it out but as the years have passed and they’ve gotten a bit better at counting that’s not really working out so well.
I’ve scoured the internet and surveyed friends and come up with some healthier alternatives to the traditional chocolate egg this Easter.


We hope you have a happy, safe and healthy Easter. xxx
Posted by admin in Babies 0-6 months, Babies 6 months - 4 years, How to, Safety on March 19th, 2014
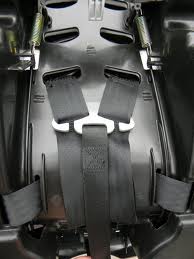
All child restraints in Australia that comply with the Australian Standard require the restraint to be fixed to the vehicle at two separate points – using the car seatbelt and a top tether which anchors to to a child restraint anchor point in the vehicle. You can install a car seat yourself, however research shows that a large proportion of restraints are incorrectly fitted, putting children at risk of serious injury and death.
A 2009 Monash study of almost 2000 car journeys involving children in restraint seats found that children had been incorrectly restrained up to 88 per cent of the time, depending on the restraint type; 88 per cent of forward-facing seats were wrongly installed, followed by infant seats (67 per cent) and booster seats (63 per cent).
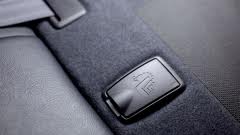
The quick answer is No. It really depends on when your car was manufactured as to whether or not your vehicle has an anchor fitting point.
Sometimes its very easy to find an anchor point as they will have the bolt already in place and many modern vehicles have a cover over the point with this symbol identifying it as such.
Where there is no anchor bolt present there will sometimes be just a threaded hole that needs to have the anchor bolt and fitting installed. They can be located in a variety of places and could be hidden by a plug or cover. Anchor points could be located in the parcel shelf, in the back of the rear seat, in the boot floor or even in the roof behind the rear seat. If in doubt check the location of the anchor points in the vehicle’s handbook.
The anchor bolts used for child restraints are of a particular size and incorporate a thread that will not be used anywhere else in the area of the anchor points. If the anchor bolt easily screws into the point you have located, it will be the anchor point.
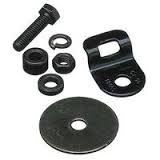
You will need: An anchor kit which includes the anchor bolt, washer, spacers, and anchor bracket that will be used to anchor the child restraint to the vehicle.
All the staff employed by Rockabye Baby Equipment Hire are accredited restraint fitters and we offer a professional restraint fitting service – just click here to make your booking or call us direct on 02 95994942 and we can discuss your requirements.
Posted by admin in Attachment Parenting, Babies 0-6 months, General, How to, Safety on February 24th, 2014
The practice of co-sleeping is becoming more and more prevalent in Western countries. Recent research conducted in the USA and Australia revealed that:
Despite the rise in bed-sharing, the practice has its detractors. Here are some of the pros and cons, to help you make up your own mind.
Advocates of co-sleeping argue that it is natural and beneficial for baby, makes bubba feel safe and secure, builds a greater bond between parent and child, and makes it easier to breastfeed and settle baby during the night. Many parents who sleep with their baby report a greater sense of ease, knowing their child is always close. In addition, many advocates of bed-sharing believe that co-sleeping infants cry less during the night.
A number of health bodies, including the highly respected SIDS and Kids, argue that sleeping with baby actually increases the risk of Sudden Infant Death Syndrome (SIDS) and fatal sleep accidents.
Instead of bed-sharing, SIDS and Kids recommends sleeping a baby in a cot next to the parents’ bed for the first six to twelve months. Nevertheless, the jury is out and there are conflicting opinions about the dangers of co-sleeping, with some doctors pointing out that cultures that traditionally practice safe co-sleeping enjoy the lowest incidence of SIDS.
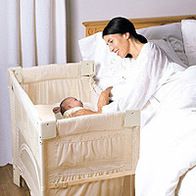
Arms Reach Cosleeper
Still unsure? There is an alternative.
The decision to co-sleep is a highly personal one. Ask questions, do your research and, if you’re still unsure, you might prefer to walk the middle ground, and buy or hire a special bassinet, known as a co-sleeper, that attaches securely to the side of your bed. Baby will still be close to hand but he or she will also be on a separate sleeping surface.
Posted by admin in Babies 0-6 months, Babies 6 months - 4 years, How to on February 21st, 2014
Ah the joys of watching your baby master new skills. I remember very well how excited I was to introduce solids to my little girl and watching her eat a mix of raw avocado and greek yoghurt pleased me no end. She still doesn’t believe me that she really did love to eat those two together.
Without stating the obvious, babies learning to eat is a very messy business. We always had a bunch of $2 shop shower curtains when my little one was small that I threw down under the highchair to save having to wash the floor after every meal where what seemed like 50% of the food would end up flung on the floor.
Some highchairs like our Stokke Tripp Trapps are very easy to clean, others have a nice puffy cushiony cover which can have tiny little folds and corners and hidey-holes where food hides and is very hard to get out. You’ll be using your highchair for quite a bit of time so cleaning it is a job everyone is faced with at some point. Here’s our guide on how to clean your highchair – hope it helps.
NOTE: Doing this outside in your yard or a space where water splashing on the floor doesn’t matter is a good idea.
Posted by admin in Babies 0-6 months, General, How to, Safety on February 16th, 2014
This is one of those jobs we’ve become very good at. No matter how well you put baby’s nappy on, no matter how certain you are that the bib will catch everything, somehow, baby capsules get really messy over time and need a good clean.
Thankfully a part of the Australian Standard for baby capsules specifies that the covers on the capsule must be easily removed for cleaning. “Easily removed” is a broad term in our experience and some covers are much easier than others to get off. Most times you’ll find some helpful cleaning advice in the instruction manual that comes with your capsule or carseat.
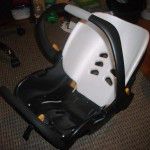
The shell of your restraint can be cleaned while its “in the nude” – we suggest you use a mild solution of disinfectant and warm water and wipe the body and handles down and then dry with a clean towel.
Posted by admin in Breastfeeding, General, How to on November 14th, 2013
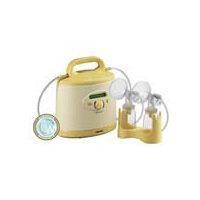
I just had a lovely customer who has hired a Medela Symphony to express breastmilk at home call and ask how to clean her kit. So I explained it all on the phone and though to myself – I should probably do a factsheet so that other customers can print it out and have a read of it when they want to clean their kits too. So here’s how.
Cleaning your kit properly is very important to maintain the health and hygiene of your milk and to keep baby safe.
When you first get your kit you must clean the kit before you use it. It is sterile but its always safer to give it a good clean first.
Please note – word to the wise here – your kit isn’t dishwasher safe and the dishwasher isn’t clean enough so handwashing is a necessity.