Recent Comments
No comments to show.
Posted by admin in Attachment Parenting, Babies 0-6 months, Babies 6 months - 4 years, How to, Safety, Sleep on July 21st, 2015
Infant sleeping bags can be a great option for babies as they eliminate the need for any extra bedding and for babies who roll around lots in bed it means they can’t get completely uncovered and cold. Sleeping bags also eliminate the need for lots of bedding which can become a suffocation risk in bed.
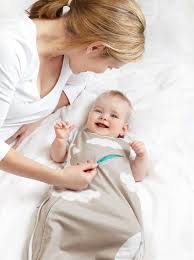
However, some baby sleeping bags on the market – particularly but not limited to those sold overseas and on online auction sites – have hoods despite hoods posing a significant safety risk to babies.
Hooded sleeping bags can potentially cover a baby’s face while they sleep, increasing the risk of suffocation significantly.
Posted by admin in Attachment Parenting, Babies 0-6 months, Babies 6 months - 4 years, How to, Sleep on July 19th, 2015
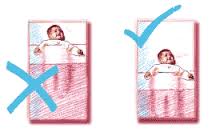
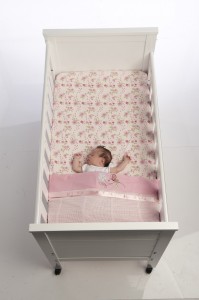
So, you’ve painted the nursery, bought the pram, set up the cot and are ready for baby to come home. Its very important to understand and follow the safe sleep guidelines to keep your baby sleeping safely day and night.
The guidelines for making up your baby’s cot have been prepared by SIDS and Kids and are a set of simple easy to follow recommendations to reduce the SIDS risk. SIDS and Kids Safe Sleeping is an evidence-based health promotion campaign developed for health professionals, childcare workers, new and expectant mothers, parents and anyone who cares for babies and infants. Since its inception in the early 1990s, the Safe Sleep campaign has reduced the incidence of Sudden Unexpected Death in Infancy by 80% saving 8,480 babies’ lives.
For more information on Safe Sleep please visit SIDS and Kids.
Posted by admin in Attachment Parenting, Babies 0-6 months, Breastfeeding, How to, Safety, Sleep on July 17th, 2015
When you are becoming a parent you’ll often find yourself bombarded with lots of information – some helpful, some not so much so. One of the things as a parent you will need to learn about are how to put your baby to bed safely. SIDS (Sudden Infant Death Syndrome) is a genuine concern for all parents and at present the cause of SIDS remains unknown.
For some time there was a theory that there may be a link between SIDS events and the bacteria Staphylococcus aureus (S. aureus) which can be present in baby’s bed mattresses. SIDS and Kids has reviewed the research to date and has found that there is no evidence to show that there is an increased risk of SIDS for babies who sleep on the back and on a firm, clean, well fitting mattress that is in good condition. There is no reason for you to buy a brand new mattress for every baby if the mattress you have or are hiring is clean, firm, it fits the bed its being used in well without any gaps it is perfectly safe.
A complete copy of the Information Statement can be found by following this link to the SIDS and Kids Website.
Posted by admin in Attachment Parenting, Babies 0-6 months, General, How to, Maternal Health, Pregnancy on May 27th, 2015
When you first fall pregnant, 9 months can seem like FOREVER. All the shopping and appointments and excitement among family and friends is so wonderful and you can’t wait to hold your very own baby in your arms. But before you know it, you have your baby shower or gender reveal party behind you and and just a big belly in the front and wham! your due date is just weeks away. Why not check out our list of 10 things you should get done BEFORE bubs arrives.


Posted by admin in Attachment Parenting, Babies 0-6 months, General, How to, Pregnancy on May 26th, 2015
Whether you’re hosting a Gender Reveal Party or you just want a cute way to tell family and friends that you are having a baby boy or girl, we’ve got our top 10 gender revealing ideas to help you make the big announcement.

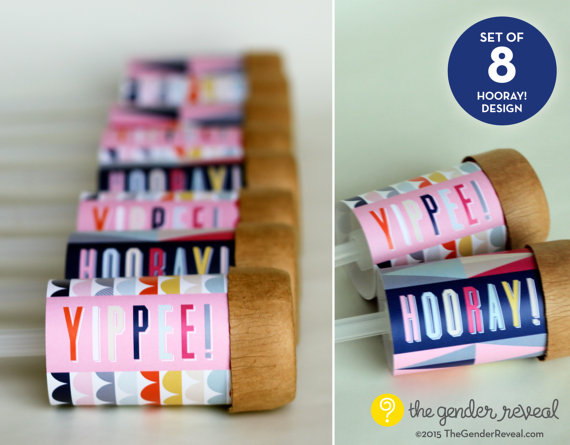
Gender reveal parties are a fun way to include family and friends in the joy and excitement that comes with a new baby. Feel free to share your own gender reveal party ideas below or your pics on our Facebook page.
Posted by admin in General, How to, Safety, Travelling with kids on May 8th, 2015
For many parents, the idea that the seat be installed the tighter it can go the better. For many reasons including the engineering that goes into the restraints and crash dynamics this is somewhat untrue and can cause unnecessary anxiety.
Ideally No. For a more satisfactory fitment and one, which is less likely to cause unnecessary injury to all passengers, we recommend and always work until we get a firm fitment.
If you’ve followed the manufacturers’ instructions accurately, some movement may be present – and that’s ok. Despite a common opinion, pushing on a restraint particularly at the end that it is not attached to the car, and pushing it with your hand from side to side is not a valid test and may only loosen the seatbelt’s relationship with the restraint leaving it requiring reinstallation. If you want a firmer fitment, then there are many ways that can be achieved. Your particular restraint may have device that can contribute to that, otherwise a ‘Gated buckle’ or deploying the ALR seatbelt (if available) may be useful for this purpose.

Going by the Australian Standards, engineering and testing processes a restraint does not have to be ‘rock solid’ to be safe. Be mindful that even mild tension on the vehicle seat cushion may damage the vehicles trim, especially leather trim. Restraints can also be damaged by over-tensioning. A good rule of thumb is that if you pull on the car seat, if it moves more than 1 inch from front to back, or side to side – and this is the important bit – at the the belt path end of the restraint, it is not tight enough.
Often parents will grab the opposite end of their capsule base (where it not tethered) and start pushing it side to side and become anxious that the base isn’t installed correctly and is dangerous. As long as the restraint is fitted to the manufacturer’s specifications and the restraint is not moving more than an 1 inch at the belt path area it is in fact fine.
Be mindful that even mild tension on the vehicle seat cushion may damage the vehicles trim, especially leather trim. Restraints can also be damaged by over-tensioning which is a common issue with people not qualified to install your seat.
If you have followed the manufacturer’s instructions and are still concerned please seek professional advice from an RTA or ACRI accredited restraint fitter.
Posted by admin in Babies 0-6 months, Babies 6 months - 4 years, General, How to, Safety on May 8th, 2015
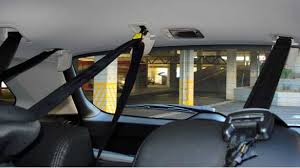
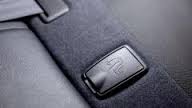
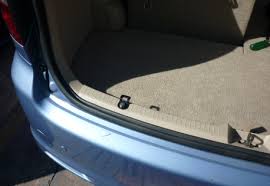
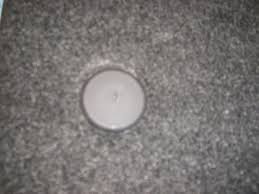
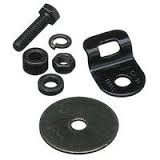
We have many calls and emails a week with people having trouble trying to find the child restraint anchor points in their car. Sometimes even we have trouble finding them when we go to do installations as there’s a fairly variable range of position, type, material and location in different cars.
Depending on the date your car was built your vehicle may or may not have anchor points already present and ready for use. It is important to note that in the rear of cars the luggage points are not confused for anchor points. This is something we see often with seats installed by well meaning relatives or friends. Unfortunately the luggage tie down points are just that – for luggage – and in an accident are not built to withstand the huge force that will be brought on it meaning the seat may not stay restrained in the car and the passenger could suffer serious injury or worse.
Sometimes you will have to actually drop the backrest of the seat forward to locate the points. If you have your car manual that will often give you the location of the restraint points to clear up any confusion between what they are and what are luggage tie down points.
Anchorage points are required to be in vehicles in accordance with the AUSTALIAN DESIGN RULE 34 (ADR34)
It is important to note that not all vehicles come fitted with an anchorage point. Some vehicles will require modifications to accommodate anchor points, while in some situations it can be illegal to install an anchorage point so it is best to refer to the owner’s manual of the vehicle or contacting the manufacturer before purchasing.
Imported vehicles require anchorage point to be established in most vehicles, prior to the vehicle being registered.
Some Dual Cabs do not have anchorage points. If required, it is possible to fit Anchorage Points to most Dual Cabs.
Some vehicles do not cater for the larger families with small children and therefore the vehicle has no 3rd row anchorage points. Again its worth checking prior to purchase.
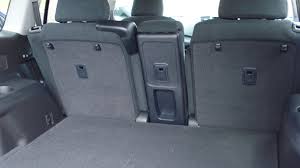
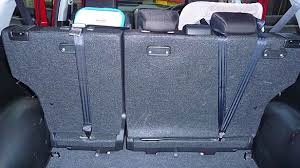
Some images of child restraint anchor points are set out below:
It was a night like any other, my children were in bed, I had finished my jobs for the night and I was sitting watching the late news. A story came on about the latest child dying in a hot car and at that moment something came over me. That was the moment I decided to create Check the back seat for me. I was overwhelmed by sadness for these parents that somehow ‘forgot’ their child was in the car and continued on with the day resulting in vehicular heat stroke and death. That was 8:30 at night, by 4:30 the next morning I had designed the products, researched statistics and I was determined to start a movement to stop these kids from dying. Like most people reading this article I too find it incredibly hard to believe that this could happen but it is happening and we must do something to prevent it or at least reduce the occurrence.
Our days are hectic, consisting of work, planning healthy meals and running the kids to all their activities. Some days it’s nonstop and can be overwhelming, we have all felt overwhelmed.
It’s not easy to admit this but by sharing this story I may be able to save children’s lives. It was a morning when my eldest son was 2 years old and my youngest was under a month old. My youngest had silent reflux for the first few months of his life and my eldest was teething. I had not slept well the night before and I was so rushed in the morning I had forgot to have breakfast, I think I was running on autopilot.
That day it took me more than an hour to get the boys into the car, with the youngest doing a number 3 right before we walked out the front door and my eldest was in a terrible mood, all three of us were. I put both children into the car and once arriving at a shopping centre took my 2 year old out of the car. My plan was to put him into the pram and put the baby in one of those pouches you strap to yourself. My 2 year old became very difficult and didn’t want to be buckled into his pram, it took several minutes to get him in, and he was struggling against me. It was hard work and I was already exhausted from the night before. All I wanted to do was get into the shops get the shopping done and get home. To add to this another car was parking in the next parking bay and was coming very close to us, I wanted to get out of there quick.
I pushed lock on the car remote and headed to the shopping centre entrance. I walked about 20 metres and as those auto doors began to slide open it clicked, I remembered the baby and we raced back to get him. I was shaking even though we had only travelled 20 metres. All the “what ifs” went through my head. It was a warm summer morning too, what if what if what if. I’m not a forgetful kind of person, my boys would tell you I am a pretty good mother and if you asked I would have said ‘No that would never happen to me”.
That was the first and only time but it could have ended in tragedy, I never forgot it and if I was wearing a Check the back seat for me Wristband or had the Heart Reminder Keyring on my car keys it wouldn’t have happened at all.
Ive learnt a lot since I started Check the back seat for me. For instance On a hot day a car can go from 30 degrees to 70 degrees within 5-10 minutes.
The NSW department of Community services created a document for the summer school holidays of 2011 and 2012. It states several interesting points and they are:
On a normal Australian summer day a parked car can be as much as 30-40 degrees hotter than the outside temperature. For example on a 30 degree day the temperature of inside the car can be as much as 70 degrees. If like me you attended school in Australia you would remember the 40 degree days where we felt like we were dying and the teachers would allow us to lie on the cool line to try to cool our little bodies down. I can’t even imagine what 70 degrees is like.
The document goes on to tell us that as the temperature rises children begin to develop heat stress (hyperthermia) and also to dehydrate. What can following the dehydration is seizures, stroke and ultimately death.
Children may also become distressed and try to get out of their restraint. If the harness on the restraint is loose, children are at risk of strangulation on the harness. So much can go wrong, its chilling to think about.
We can put a stop to this and the first and most important step is accepting that this could possibly happen to your family or a friends family. It’s a sensitive topic and it’s hard to stomach but it’s been proven that saying “this would never happen to me” does not prevent it from happening.
In Australia during the summer of 2014 the NRMA rescued 20% more children from hot cars than the summer of 2013. Our lives are busier than they ever have been before, there is so much required from us, both parents need to work to afford the rent or mortgage, we are often overwhelmed.
A recent case in Victoria saw a mother drive to the daycare centre to collect her child that she allegedly believed to have dropped her 22 month old son off at that morning. Upon entering the centre they made it clear to her that she in fact had NOT dropped the child off and when she returned to her car she found her son in the back seat. He had passed away. It’s alleged the mother had taken her other child to primary school and had gone about her daily chores not realizing she actually hadn’t dropped the toddler at daycare. Her boy had been left in the car and had died. I am 100 percent sure she didn’t do this on purpose (she was unable to be interviewed for several days after this happened) she simply forgot. Maybe she was stressed, maybe she was on autopilot, and maybe there were dramas in her life that had distracted her so much that it caused this to occur. I not suggesting I know this woman and how she thinks but I bet that if you spoke to her a year ago she may say that such a terrible accident could never happen to her.
I could go on with stories and statistics but Im sure you are understanding that this is happening a lot more than what we thought and the heat changes occur a lot faster than most of us thought too.
When an accident or death occurs in the work place there are then procedures and policies put into place to prevent these accidents from happening again.
Up until I created this product there was nothing available that looks great, is cheap, accessible to everyone and you don’t need expensive fancy equipment to make it work.
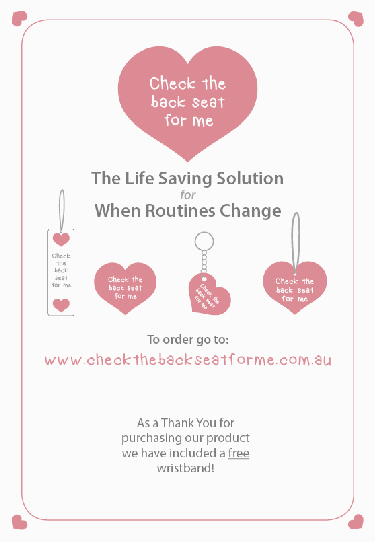
Now your Check the back seat for me safety pack is here, it’s available to everyone and affordable. What if this pack was the difference between life and death in your family? It’s a simple solution to a devastating accident that is happening more and more often in each passing year.
Our mission at Check the back seat for me is to prevent or at least dramatically reduce the amount of child deaths in hot cars. I want this product to go Australia wide then worldwide so we can start saving children’s lives now!
Well as you saw in the above story, I didn’t have much sleep the night before, I hadn’t had breakfast, my eldest was being very difficult and I was distracted by another car parking too close to my vehicle.
There are other situations that lead up to children being forgotten in vehicles.
A different parent/carer is asked to take a child in their vehicle when they usually don’t can result in the driver going onto autopilot, forgetting they have a child in the back of the car and continuing on to work as usual.
How many times have you arrived at a destination and not really been able to recall every part of the journey. Its not intentional, its an accident and without safety procedures in place, it IS happening. This product can help prevent this from happening to you.
One parent may believe that the other parent has taken the child inside after an outing, both parents are busy getting on with unpacking or juggling the other children. 5-10 passes and it can be too late.
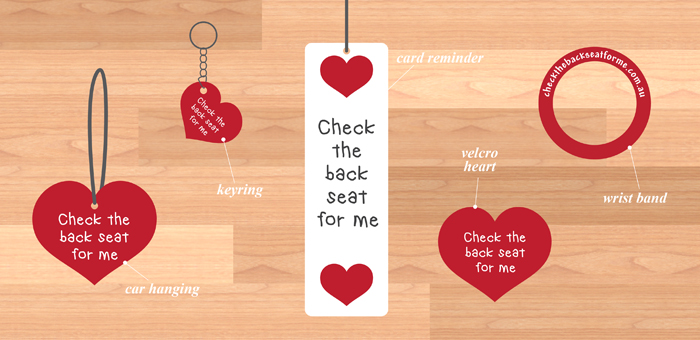
So you are probably wonder how to use our pack and is it easy to use? Well read on and you will see what a simple, easy, life saving solution it is.
The idea is to leave the pack in the child seat, then place into the drivers seat to remind you to use an item from the pack.
After securing child with seatbelt return to your driver’s seat, choose the item you want to use and place it in the suggested locations inside same vehicle, as long as it is safe to do so. Easy!
The reason why there are five choices in the pack is that we recommend you use a different item each time so it stands out and your brain continue to notice it.
The Herald Sun recently reported that The State Government has promised to increase penalties for leaving children in hot cars, with fines up to $3700 and jail time increased from three months to six months. This is a step forward but I believe my product is a practical lifesaving alternative that can work right now. Whats the point in fining someone if they have already lost a child. Who knows, maybe I have already been able to save lives by having my Check the back seat for me Facebook page.
Dads, if you want to earn brownie points this would be a thoughtful Mother’s Day gift (from the kids) showing you are proactive in helping to prevent this devastating accident happening to your family.
Simply purchase the pack, leave a few of the items in each car and pull them out when routines change or when you are having ‘one of those days’. It’s also suggested that the Rear View Mirror Heart Reminder can remain on the mirror and as it swings it reminds.
To purchase your pack go to www.checkthebackseatforme.com.au or go onto our facebook page Check the back seat for me ‘like’ and click on Shop Now in the large picture at the top of the page. In the first week we sold over 70 packs and feedback is telling us that our pack is being purchased by one parent and being shared between all the cars in the family. Priced at $22.95 (including postage and handling) how can you go past this cheap and simple solution.
Written by Penny Arnold, Founder, Check the back seat for me.
Posted by admin in Attachment Parenting, Babies 0-6 months, How to on March 31st, 2015
Making your own chemical free baby wipes is a great way to control what goes on your baby’s skin each day. Homemade wipes are also a great deal cheaper so you can save lots of money, and customize the solution for your baby’s sensitive skin.
There are lots of commercially available products on the market but their ingredients list sound like a science experiment. A sample ingredient list from a popular Australian baby wipes pack reads like this:
Water, Disodium EDTA, Xanthan Gum, Caprylic Triglyceride, PEG 40 Hydrogenated Castor Oil, Benzyl Alcohol, Iodopropynyl Butylcarbamate, Sodium Hydroxymethlyglycinate, Tocopheryl Acetate, Zea Mays (Corn) Oil, Phenoxyethanol, Butylparaben, Ethylparaben, Propylparaben, Isobutylparaben, Fragrance.
Plus they’re expensive. It is however really easy to make your own, either as a spray or solution to use with washable wipes or using paper towel for a more disposable option. All the ingredients are readily available in supermarkets or chemists and once you have your bathroom stocked you should have enough ingredients to make a few batches.

Combine all ingredients, adding water first to avoid creating lots of bubbles. There are many different ways to use and store homemade baby wipes and solution. Choose the method that works best for you:
You can place your reusable cloth wipes in a repurposed baby wipe container or tupperware type storer and pour solution over wipes until moist, but not drenched. (You may have solution left over.)
You can also add the solution you’ve made up to a spray bottle and use as required. Shake well before each use to blend the ingredients each time and then spray your solution straight onto the wipe each time.
You can also spray directly onto your baby but this could be a bit of a surprise for them! Then dry with a dry wipe.
PLEASE NOTE: homemade solutions can go off much quicker than the commercial preparations. Make the wipes or solution in small batches, enough to last a week or two weeks at most.
Posted by admin in Babies 0-6 months, General, How to, Pregnancy on March 18th, 2015
Having a new baby in the house is a real joy, all those “firsts” we look forward to, the peaceful times of cuddles on the couch and quiet walks before bed. But having a new baby also makes you surprisingly busy with all the care they require. Doing a little preparing and planning ahead can mean the difference between chaos and serenity. Some quick simple tips to help you save time and get some “me time” in are set out below.

Posted by admin in Attachment Parenting, Babies 0-6 months, General, How to on March 18th, 2015
Just like us, babies are people too and individual people so sadly there’s no one size fits all method of helping babies get to sleep. It may help you feel a little better to know that “sleeping through the night” in baby terms means 5 hours straight. If that’s not happening for you and you’re feeling exhausted and sleep deprived, there are some gentle strategies you can try to help your baby get to sleep and sleep longer.


Hopefully one or a combination of these tips will help you get your baby off to sleepyland. G’night.
Posted by admin in Babies 0-6 months, Explore Sydney, General, How to, Safety, Travelling with kids on March 18th, 2015
Our good friends at Maxi-Cosi were the first infant car seat provider to offer ISOFIX-compatible infant car seats with the launch of its ISOGO range. ISOGO is an ISOFIX compatible system for Maxi-Cosi child restraints.

As experts in child mobility, Maxi-Cosi is an international leader in the production and testing of child restraint products. Maxi-Cosi’s ISOGO is a simple and user friendly latch system that enables parents and care givers to safely connect their Maxi-Cosi child restraints to their vehicle’s ISOFIX lower anchorages in a simple step. With its green and red indicators, the question of whether or not you’ve done it correctly is eliminated giving parents peace of mind that the installation has been done correctly at just a glance of the indicator.
With a staggering 88% of infant car seats not fitted correctly, Australian parents have been desperate for ISOFIX-compatible seats so this range has been very welcomed by our customers.
ISOFIX compatible systems must comply with the Australian/ New Zealand 1754 Standard. Seats that comply must be fitted with rigid or flexible lower attachment connectors as well as top tether straps. The dynamic testing required varies from country to country and therefore a child restraint that is purchased overseas is illegal and any insurance will be null and void in the event of an accident. The Australian/ New Zealand 1754 Standard is known to be the most stringent in the world.
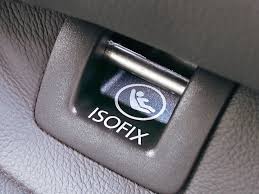
Designed to make fitting an infant car seat sercurely easier, ISOFIX is an international standardised fitting system for attaching infant car seats securely without the need for the vehicle lap sash seatbelt. Most modern cars sold in Australia offer ISOFIX mounting points, but if you’re not sure take a look at the base of your backseat in the gap between the base of the seat and the back of the seat. Generally there will be some writing saying ISOFIX above the mounting points; if in doubt, check with your local mechanic. See image below:
According to Maxi-Cosi, “fitting a Maxi-Cosi ISOGO car seat is easy. Simply click your ISOGO car seat into your car’s ISOFIX lower anchorage points and click the upper tether strap. You can then check the seat is correctly installed by making sure the harness tension colour indicator is green”.
“Our family is always on the go, so it is wonderful to finally have a car seat that?we can fit so quickly and be confident that it is properly fitted and secure,” says mother-of-two and Maxi-Cosi Ambassador, Rebecca Judd.
“Maxi-Cosi ISOGO has taken the guess work out of fitting our kids’ car seats, and we now have greater flexibility should grandparents or friends wish to borrow a car seat for a special day out”.
Maxi-Cosi ISOGO car seats and capsules are available for both hire and purchase on our site.