Recent Comments
No comments to show.
Posted by Danni Guerreiro in Babies 0-6 months, Uncategorized on November 1st, 2022
While hearing those words in relation to your baby may sound a little scary, hip dysplasia is in fact a very common occurrence in babies. And, thankfully, its easily corrected by wearing a hip brace for a prescribed amount of time.
There are several different types of brace that might be used and each provide their own set of potential complications in relation to children and their carseats.
The main issues relating to children in hip braces are:
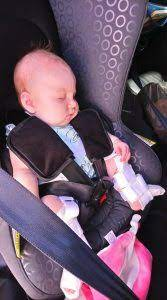
1. They are quite wide and their shape prevents infants from sitting in their restraints properly.
2. The shape of the brace causes the child to have an unnatural void beneath their bottom.
Sometimes the use of towels rolled up and placed underneath the child’s bum and knees to provide additional support is recommended by the child’s occupational therapist or Dr so that the infant is supported sufficiently and can be restrained safely in their child restraint.
We do not recommend attempting to set up the towels yourself – please ensure you are guided by your child’s occupational therapist or health care professional.
With certain types of braces, you may need to reach out to the child restraint manufacturer and see if they have a longer crotch buckle available for your carseat. Always contact the manufacturer direct rather than using aftermarket accessories or items for sale online as many are not safe and can have a major impact on the safety of your child restraint.
It’s important to note that not all child restraints will work with a hip brace ie. narrow restraints may put undesired pressure on the child’s knees which could potentially affect the healing process and cause the child to be uncomfortable and unhappy in the car.
Ideally a wide restraint rather than a baby capsule is the desired option as it will allow for the child to fit safely and comfortably.
Here are a few carseats to consider for your child with a hip brace:
InfaSecure Luxi 0-8 range.
Britax Millenia or platinum 0-4 or Britax Maxi Guard.
Joie Itravel 0-4
Nuna Rava 0-4
This list is by no means exhaustive – there may be other options more suitable to your needs. Speak to your health care provider who may also be able to recommend a suitable restraint for your child.
For more information please visit https://www.healthyhipsaustralia.org.au/carseat-options-hip-dysplasia-treatment/
Posted by admin in Attachment Parenting, Babies 0-6 months, Breastfeeding, General, How to, Pregnancy on August 7th, 2021
Many women decide during pregnancy they want to breastfeed their babies when they are born. While breastfeeding is perfectly natural it still takes some getting used to and there are many (common) concerns Mums have when they begin their breastfeeding journey. Questions like “How do I know my baby is getting enough milk?”, “Will it hurt?” and “Where can I get help if I need it?” are very common themes. We’ve set out 10 tips and tricks for Mums who are planning on breastfeeding, a little guide if you like to answer the most commonly asked questions and hopefully answer any questions you may have.
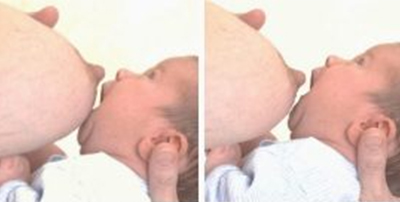

Learn the signs that your baby is getting enough milk Some good signs that your baby is getting enough milk are:
Posted by admin in Babies 0-6 months, Babies 6 months - 4 years, General, How to, Safety on November 13th, 2020
Before commencing any installation its vital that you read the manufacturer’s instruction manual in full. If you don’t have a copy most seat manufacturer’s websites have a section with downloadable manuals available for car seat users.
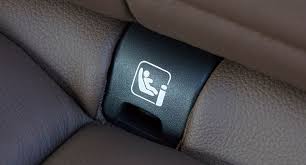
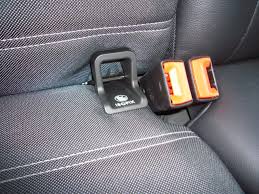
When you have read your manual head over to the car. The first thing to do is locate the ISOFIX mounting points which are usually at the bottom of the seat where the seat back meets the seat base. If the car has ISOFIX mounting points, the location may be identified by a symbol on the carseat like these:
![]()
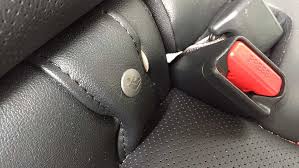
Sometimes the ISOFIX anchorage bars may be visible like this:
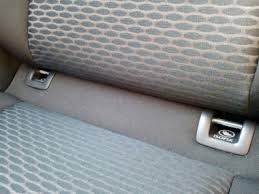
If your child restraint has rigid connectors fitted, engage each connector to the corresponding ISOFIX bar on the vehicle:
Push the child restraint towards the backrest applying a firm and even pressure on both sides. Care should be taken to ensure both sides have been engaged. This can be confirmed when the ISOFIX indicator turns from red to green.

If your restraint comes with flexible ISOFIX connectors (built on seatbelt material), engage the connectors into each ISOFIX low
anchorage. A click may be felt and a green indicator will show on the top of the flexible connector when it has engaged.
Pull each strap to ensure both lower anchorage connectors are engaged and all slack is removed from either side.
All ISOFIX compatible child restraints also require the use of the top tether strap which must be attached
to the vehicle’s child restraint anchorage point, and be adjusted to remove slack. Please note the top tether strap is engaged to minimise any forward momentum in a rear end accident. It needs to be adjusted firmly but not overtensioned otherwise your restraint will lift off the car seat and feel loose when touching.
No ISOFIX? No problem
Please note if your car does not have ISOFIX available, all Australian ISOFIX compatible child restraints are also able to be installed using the car seatbelt and top tether strap, just as in non-ISOFIX compatible restraints. The rigid connectors on the child restraint can be retracted if you are installing using the car seatbelt.
Can I use a restraint purchased or manufactured overseas?
Child restraints purchased from overseas, including ISOFIX compatible child restraints, are illegal to use in
Australia as they do not comply with AS/NZS 1754. Unlike the European standard, the Australian/New Zealand Standard requires all restraints to:
AS/NZS 1754:2013 specifies child restraints Types A1/A2/A4, Type B, Type D, Type A1/B, Type A2/B, and Type A4/B are allowed to be fitted with ISOFIX attachment.
Booster seats and Type G combinations cannot use ISOFIX anchorages as there has been some concern
internationally about their likelihood for the occupant to submarine and Type G restraints are not allowed as the low anchorage may not be strong enough to withstand the crash load.
Posted by admin in Babies 0-6 months, Babies 6 months - 4 years, General, How to, Safety, Travelling with kids on November 13th, 2020
Child restraints are designed to be installed in most passenger vehicles, without requiring any additional after market fitting accessories.

Incorrect use and placement of additional comfort or fitting accessories by parents and carers can reduce the safety of the installation and should only be used if recommended by a qualified restraint fitter.
Accessories for child restraints, other than those supplied upon purchase by the manufacturer and crash tested with the restraint under either AS/NZS 1754 or AS/NZS 8005 are not recommended.
The following reasons apply to some specific accessory items that are sometimes used in conjunction with children in child restraints. None of these accessory items are recommended for a variety of reasons.
Several common designs of seatbelt positioners link the sash and lap sections of a seatbelt, raising the lap belt up into the abdomen which increases the risk of submarining and abdominal injuries. If children cannot fit well in an
adult seatbelt, they should use a booster seat with a lap-sash seatbelt.
Buckle covers and other devices to stop a child from unbuckling a restraint can impede the rapid removal of the child in the event of an emergency (e.g. after a crash). Behavioural solutions are preferred wherever possible. If you do need to utilise a buckle cover aim to buy the model simplest to remove.
Adding additional padding, pillows and cushions that surround the head or neck that are not provided by the manufacturer and tested with the restraint, may result in the inbuilt harness or seatbelt being slack and/or encourage incorrect seated posture and therefore not optimal belt positioning. Pillows behind the head might increase the risk of head injuries in side impacts by pushing the head forward and beyond the side wings of a restraint.
After market belt tensioners are generally not required for standard installations. Where they are required the restraint manufacturer will provide an appropriate accessory and include instructions on how to use the tensioner in the manual. If used with booster seats or seatbelts, they can lead to injury if over tightened and they may make the seatbelt buckle more difficult to unbuckle in the event of an emergency. When used incorrectly to install a child restraint, they may deform the restraint, reducing the restraint’s strength.
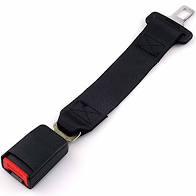
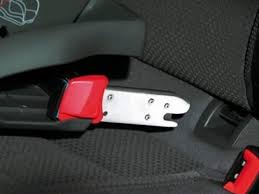
A seatbelt extender is an extra piece which goes between the male and female ends of the seatbelt and makes the belt longer and more accessible. Originally designed to be used by obese adults to allow them to buckle up where the belt would have otherwise been too short to meet and buckle up. However they are now advertised as a solution to a variety of “problems” such as making it easier to buckle a child into a booster or carseat.
Seatbelt extenders should not be used if the buckle is located in contact with the child’s body. They can introduce slack into the belt which could increase the chance of the buckle being located in front of a child’s abdomen and causing injury. They can also interfere with the correct belt path if used with a booster seat. They also require the parents or carer to check that both the extender buckle and main belt buckle are connected each time, with the possibility that one buckle can be inadvertently unsecured without the knowledge of the carer.
Rigid toys and other types of entertainment accessories may pose a risk of injury if they come in contact with the child in a
crash. Also, if not secured, rigid toys may become projectiles in a crash and injure any of the vehicle occupants. Only soft toys that contain no rigid parts should be used unsecured in a vehicle.
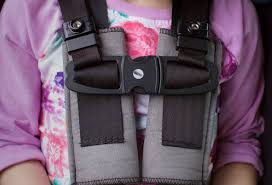
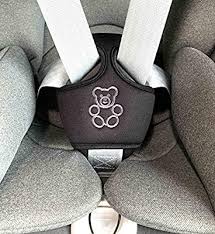
Designed to prevent the child from removing their arms from the inbuilt harness, pose a strangulation hazard and could injure the child’s throat or chest in a crash or the chest. Behavioural solutions to a child slipping their arms out of a harness should be employed wherever possible.
Sun shades or insect nets, which cover both the child and restraint, may prevent a parent or carer from seeing a child misusing their child restraint or in distress. Such covers may reduce air circulation and result in the overheating of children.
If you have any questions or require any assistance with your restraints feel free to reach out, our staff are always happy to help.
Posted by admin in Attachment Parenting, Babies 0-6 months, Babies 6 months - 4 years, General, How to, Safety, Travelling with kids on September 22nd, 2020
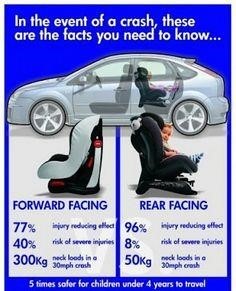
Did you know that if your child’s car seat was forward facing and you were to have an accident their neck would be hit with the force of between 180kg-220kg? Whereas if they were to be rearward facing that force would reduce to 40kg-60kg?
Without exception, rearward facing is the safest way for babies and children to travel in a car. While Australian law states that children can legally move to a forward facing restraint from 6 months onwards, this legislation also states that children can be kept in rear-facing car seats until they are four years old. It is safest to have children continue to rearward face for as long as the car seat allows. The law is the minimum and a guideline only, not a rule. Lets face it – who wants to aim for the minimum safety for their child?
The choice to go with extended rear facing or switch to forward facing is a personal one that it is different for every family and every child however as professional restraint fitters we will always recommend rear facing for as long as possible.
The benefits of extended rear facing really come down to safety. If you were in a collision your child will be safer in a rear facing position. This is because of the way the car seat cushions the body in a rear facing versus forward facing position.
Rearward facing restraints are better designed to support a child’s head, neck and spine in the event of a crash. Upon impact, your child’s body is cocooned in the restraint while the forces of the collision are distributed across the shell of the seat. In a forward facing seat, a child’s head and body is thrust forward with the crash forces, and the harness is the main point of contact.
In children, this forward motion has the potential to cause serious injury as their muscles and bones are not yet developed enough to support themselves from the impact, unlike an adults body. Many parents turn their babies forward facing at 6 months old believing it’s a milestone, however it is always much safer to keep them rearward facing for as long as you can.
A video showing the difference between rear and forward facing can be viewed here:
Neuroscience Research Australia and Kidsafe recently released the National Guidelines for the Safe Restraint of Children Travelling in Motor Vehicles report, which outlined why rear facing options are safer for children up to the age of four.
“Rear facing restraints are highly effective in preventing injuries if used correctly because they fully support the child’s head and neck in the event of a crash,” the report says.
When considering when to turn your child’s seat forward facing, your child’s height is more important than their age. If your child’s shoulders do not yet reach the shoulder height markers on their car seat, then they must stay rear facing. Once their shoulders reach the upper height markers, it is time to turn the car seat around or consider an alternative restraint if you wish to continue rear facing. There are quite a lot of seats on the market that allow for extended rear facing including this range from Infa Secure: https://infasecure.com.au/collections/all-of-our-extended-rearward-facing-car-seats

Many parents worry about their child being uncomfortable or unable to find a safe position for their legs when they are rear facing. It is perfectly safe for their legs to touch the back of the seat in front. Children will find a comfortable way to sit and their legs are not at any greater risk in this position.
If you have any questions or need guidance about carseat choices or installation you can speak to one of our accredited restraint fitters by phone on 1300 859 775.
Posted by admin in Babies 0-6 months, General, How to, Safety on May 26th, 2020
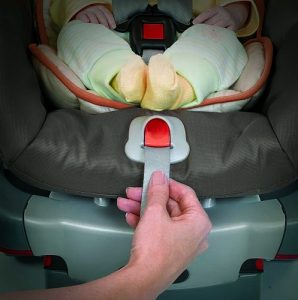
It is important to ensure you are monitoring the ongoing use of your baby capsule or carseat. As your child grows in weight and height it is important to check your baby’s shoulder height in relation to the harness straps of their restraint and, where necessary, make the necessary adjustment to the height of the harness to keep your baby safe. It is really important to ensure that the harness straps are always at or above the shoulder in rearward facing mode as there is potential for significant crash loading to be put on the child’s spine as they ramp ‘up’ the seat in the initial crash phase.
Capsules and carseats have multiple shoulder strap slots so you can move the harness up as your baby grows.
In rearward facing restraints, you should use the slot that is level or slightly above your child’s shoulders. Do not use a slot if it is below your child’s shoulders.
In forward facing restraints, you should use the closest slot to your child’s shoulders, but not more than 25mm below your child’s shoulders.
It is really important to ensure that the harness straps are always at or above the shoulder in rearward facing mode as there is potential for significant crash loading and to be put on the child’s spine as they ramp ‘up’ the seat in the initial crash phase resulting in serious spinal and other injuries.
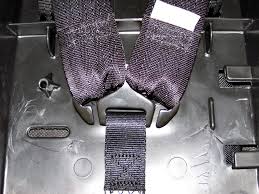
To adjust the height of your harness, you will need to loosen the harness as much as possible and lay your restraint face down, so that the spreader / G plate becomes visible on the back of the seat. Simply unhook the ends of the harnesses from the spreader / G plate, and re-thread the straps through the appropriate slot for your child’s shoulder height. When you are finished, ensure that you’ve correctly re-attached the straps to the spreader / G plates.
A link to our instructional video demonstrating how to adjust your capsule harness is here and this makes it easy to do:
Some carseats and capsules have a feature that is built into the restraint which adjusts both the headrest and the harness simultaneously. With this feature, there is no need for rethreading or undoing the harness from the spreader / G plate at the back of the seat.
Still need some help with your carseat or capsule harness? Just give us a call on 1300 859 775 option 2 to speak to one of our accredited restraint fitters.
Posted by admin in Attachment Parenting, Babies 0-6 months, General, How to, Pregnancy on March 8th, 2019
It is an exciting time when you are preparing for the birth of your new baby. There are so many changes that you have already gone through and so many more that are about to come. Your life will change a lot and in different ways. Not only do you need to prepare yourself but you also need to prepare your partner and family and also your home ready for the new arrival. We hope our list of tips and ideas will help you in your own preparations at home.

It is a good idea to stock up on the necessities before the birth of your little one. Buying a few weeks supply of nappies and wipes will help to reduce the need to go shopping with a newborn and reduces the risk of running out at a very inconvenient time (which of course will always be in the middle of the night with a huge poo explosion).
Also having a large supply of singlets, long onesies and short onesies means that you can reduce the number of loads of washing you need to do during those first few weeks.
If you are feeling up to it in the weeks leading up to the birth of your little one it is a good idea to spend a day making and freezing meals. This will help during those first few weeks when you are exhausted and not feeling like cooking. Ensuring that you are eating properly is important to make sure that you have energy and are able to continue functioning with your newborn. If you are breastfeeding you also need to ensure that you are getting a good amount of nutrients. There are many meals that can be prepared and frozen for eating later on.
The last thing you want to be doing the day you bring your baby home is setting up the cot or bassinet. It is a good idea to set up as much of the nursery as possible before coming home from the hospital. This way there is not that stress on you or your partner when you should be spending the time cuddling and relaxing with your new baby. Having the car seat / capsule properly installed before the birth is also important. At Rock-A-Bye Baby all our staff are Accredited Restraint Fitters and you can hire a capsule or carseat from us or we can install your own restraint for you.
The labour is one of the hardest things to prepare for as each and every labour is going to be different. If you have friends with children they have most likely told you their labour stories in a hope to help prepare you for yours. The first step of preparing for your labour is to have a plan in place. Decide the type of labour you would like to have and whether you would like to use any pain relief. Our labour TENS for hire are a good item to add to your labour toolkit if you’re hoping to have a drug free birth. When making your plan you need to be aware and okay with the fact that it may not go to plan. There are times when things change through out labour and different measures need to be taken and it may change the plan that you originally had. Remember throughout that the doctors and midwives are their for the safety of you and your baby and that if they recommend a different way of doing things it is because they feel it is going to benefit you both the best.

Before the birth of your baby, sit down with your partner and decide on how you would like the visitation to go after the birth of your baby. Whether you would like any one visiting on the day of birth and if so who. If you would prefer to wait until you get home for visitors then decide on times that suit you and your partner. These should be communicated to those around you and let them know that it is essential to call or message you beforehand to make sure that it is okay for them to be visiting.
Remember throughout all of your preparations and decisions to stop and enjoy the moments. There are some big changes coming and it is such an exciting and happy time for you and your family. Cherish each and every month and try not to stress too much. Accept help when it is offered and sleep when you can!
Posted by admin in Babies 0-6 months, General, How to, Safety, Travelling with kids on June 9th, 2017
As your baby grows it is important to check and, where necessary, adjust the inbuilt harness in your hire baby seat.
Your capsule would have been provided to you on its lowest (newborn) setting with the shoulder harness on the very bottom option. Week by week, new babies put on weight and grow in length and this will mean that from time to time you will have to move the shoulder straps up a level to ensure your baby enjoys optimum safety in their hire capsule.
Harness straps that are too low for baby’s height or are twisted can be the cause of very serious injury in the event of an accident so ensuring that the shoulder harness straps are flat, firmly fitted and at the right level for your baby is vitally important.
We invite you to view our instructional video that shows how quick and simple it is to adjust the shoulder straps in your baby seat:
Posted by admin in Babies 0-6 months, Babies 6 months - 4 years, How to, Safety, Travelling with kids on May 24th, 2017
We don’t want to recite statistics at you today. Suffice to say that car crashes are real and possible and we want everyone including our little people to be safe on the road.
By choosing and using your carseat correctly you can minimise the risk of injury in the event of an accident significantly.
You’ll be using this seat a lot. Is it easy for you to use? When you go to the hire company or the baby shop ask them to put the restraint on your backseat in the position it will be fitted in. How easy is it for you to get a baby in and out of this restraint?
We also suggest you test the adjustment mechanisms on the inbuilt harness – do they loosen and tighten easily? And when its time to adjust the shoulder straps can you do that from the front of the seat or do you have to completely uninstall it, adjust them then try and reinstall it each time?
Price isn’t a great indicator for quality – and that’s a good thing. There’s something available for most budgets on the market today. Don’t feel like you’re a bad parent or being cheap if you can’t afford $700 for a carseat. The biggest price tag doesn’t ensure you have the safest seat. Have a look at the CREP results. The Child Restraint Evaluation Program (CREP) is a consortium of government agencies and motorist organisations whose aim it is to provide independent and consistent information on the levels of child protection from injury in a crash provided by individual car seats and the ease with which they can be used correctly using a very simple star system with 1 out of 5 being the lowest score and 5 out of 5 the highest. Of course if you don’t wish to buy your baby capsule we have a range of high quality, clean and safe baby capsules for hire.
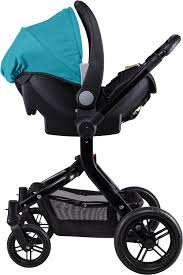
This tip relates mainly to baby capsules but gee the travel system concept is a good one! Imagine you’ve been driving around for ages and finally, finally!! the baby is asleep. Well now it would be nice to grab a coffee or do some shopping right without having to disturb the baby. So if you have a travel system compatible capsule you can just pop your capsule straight onto your pram frame and you’re off. Lots of pram companies sell adaptors to match your capsule to your pram and of course we offer a range for hire.
How long can you use this restraint for? For the early days we would recommend you consider hiring a baby capsule just for convenience, saving $ and ease of use. When you are ready to move out of your hired capsule into a carseat make sure you consider just how long this next restraint is going to be useful for. Try and find a restraint with the highest shoulder height markers for ending use so you can use the seat for a long period of time. If you hope to keep your child rear facing then an extended rear facing seat with a tall shoulder height marker will be idea for you. Or maybe consider getting one of the new Type G restraints – these use the inbuilt harness up to an average 8 year old meaning you don’t won’t ever have to buy a booster seat.
Using our tips we hope that you can get the biggest bang for your buck when it comes to buying your child car seat. Choosing the right restraint is an investment worth making.
Posted by admin in Babies 0-6 months, Babies 6 months - 4 years, Explore Sydney, How to, Safety, Travelling with kids on May 24th, 2017
There is lots of solid research both here in Australia and from overseas that shows that unfortunately, the rate of misuse of child car seats is very high.
“A 2010 study of 503 children from newborn to the age of 12 found half of all restraints had errors in how they were used. Some had up to seven errors each, ranging from failing to buckle the child in to slackness in the belts and sashes. Most often parents weren’t aware they had made a mistake.”
http://www.smh.com.au/national/health/errors-in-child-car-seat-use-putting-lives-at-risk-experts-warn-20170518-gw894a.html
When we arrive at a baby shop, instinctively we will gravitate to either a label or logo we recognise, or a colour we like. However choosing the correct product for your child is much more complex than that.
The following information is general and we strongly encourage you to read fully the instruction manual that relates to your particular make and model of child restraint.
Ensure that the seat you are considering is the right size for your child and that it meets Australian Standards and has the Australian Standards logo sticker present.
Contrary to popular belief, Australia’s Standards for car seats are in fact among the toughest in the world ensuring the best possible protection for our children on the road.
In Australia it is illegal to purchase or use a car seat that does not comply with the Australian/New Zealand Standard 1754 – even if you’re visiting. Always look for the certification mark AS/NZS:1754 on the car seat you choose for your child.
Seats are not graded by age of children but by their size. The size of children can vary – two 4 year olds can be entirely different heights and weights so check that your child’s fits within the shoulder height marker label for the specific model of car seat you are considering. Just like when you’re buying jeans – you take your legs with you to ensure the product fits so take your child with you to test the restraint does in fact fit them.
The road laws relating to kids and cars are minimums. We don’t aim for the minimum safety – but for the maximum. So keep your child in their restraint for as long as they still fit in it. When your child reaches 6 months that doesn’t mean its time to turn them forward facing. Just because they turn 3 you don’t put them in size 3 shoes – if the seat still fits – keep using it.
Use their age as a guide only.
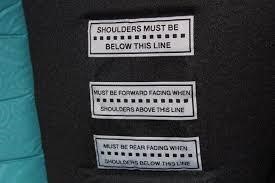
Newer seats nowadays all have a label on the restraint showing you exactly where the child’s shoulders can be to safely use the seat. Shoulder height markers make it so easy for carers to establish if a child car seat is suitable for their child and when the child needs to have the shoulder straps adjusted or when they are ready to move to the next child car seat.
Shoulder Height Markers, located on the inner side of the seat, prompt parents and carers to ensure their child’s seats, and associated harnesses, are adjusted at the right stages of the child’s growth to maintain optimal safety in the event of an accident.
Your child should remain in a rear facing seat or position until their shoulder is in-line or above the forward facing height marker.
Your child should remain in a forward facing seat until their shoulder height is above the upper shoulder height marker.
Note: There is a slight difference between rear and forward facing and that relates to the dynamics in the event of a collision.
We don’t necessarily believe that you require professional installation of your restraint however there are a lot of belts, buckles and pathways to contend with. Before you begin, ensure you have read the instruction manual for your restraint in full and be confident that you understand how to install your seat. If you are uncertain please don’t hesitate to contact us or a local restraint fitting station for advice.
Unfortunately there is a lack of understanding around the power of collision dynamics and there is an idea in the community that a car seat must be ‘rock solid’ post-fitment to be safe. This is incorrect. The Australian Standard testing procedures that these products are subjected to are stringent and demanding.
The more rigidly a restraint is attached to the vehicle chassis, themore collision force the infant will be subject to. Imagine if you will the catching arm of a cricket player. If it were completely rigid and unmoving it would shatter into pieces – exactly the same with carseats. Even the new rigid ISOFIX seats have a hinge that allow for some up and down movement to counter this possibility.
Overtensioning a restraint when installing it can cause stress damage to both the restraint and/or the vehicle seats unecessarily. A restraint that is fitted correctly does allow for some movement but no more than 2.5 cms from side to side at the belt path end of the restraint. Shaking your restraint around at the top end (where the top tether begins) is not an accurate test of correct fitment and will do nothing but loosen your restraint and perhaps leave the seat requiring refitment.
We have had customers return capsules or carseats and inform us that they didn’t use the top tether because it was annoying or took up too much time to deal with. Please – use the top tether. In an accident it serves as a very important tool to minimise the possibility of your child being injured in the crash.
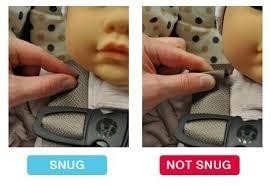
When you are using the inbuilt harness ensure that the shoulder straps are:
Keeping our list of tips in mind will help you to make a the right choice. If you have any concerns about child car seat use or how to choose please don’t hesitate to contact our Team who are well able to assist you.
Posted by admin in Babies 0-6 months, General, How to, Safety on May 8th, 2017
Bathing a newborn baby for the first time often brings out feelings of anxiety in new parents. As a former NICU/Special Care Nurse, I saw this all the time. The practice of post-natal midwives and nurses should be: show one, assist one then supervise one. Unfortunately, this doesn’t always happen for various reasons so I have a step-by-step guide as well as some dos and don’ts as a general reference. However, please make sure you follow any advice or instructions given to you by health care professionals over this information.

It is important to remember that babies needs and wants vary. Especially when it comes to things like sleep patterns, likes and dislikes. We often think babies hate baths but the fact is most of them find it relaxing and enjoyable. The part they don’t like is the undressing and then removal from the nice warm water. Once in that warm water the crying can often stop and the baby will look and feel contented. That’s why it is best to bath baby in the evening just before their evening feed then bedtime. It will take some time to work out your baby’s routines so use the evening as guide at first and choose a time when you will be less likely to have distractions.
Something I always advocate is minimal use of soaps and especially bubble bath. It might make you feel good to clean you baby with something sudsy as that is what we think cleans the best. The fact is, babies don’t need suds and their fragile skin can be made even drier because of them. You know what it’s like having dry, flaky skin and scratching, feeling uncomfortable. Imagine how uncomfortable that would feel if you were a tiny baby not capable of scratching! Also avoid scented creams and lotions. If your baby has dry skin then a little sorbolene or zinc and castor oil is very good and a lovely way to gently massage them at the same time. This is a great relaxation technique.

Posted by admin in Babies 0-6 months, Babies 6 months - 4 years, General, How to, Safety on March 20th, 2017
We do a lot of installing of carseats and capsules round here. Approximately 3 or 4 dozen a week, rising to double that during peak periods. We work very hard to ensure that our fittings always exceed the manufacturer’s instructions and do our best to teach our customers how to safely use their restraint once they leave our premises.
The one issue that seems to arise quite often is whether or not the seat is installed “tightly enough”. There is a perception in the community that a carseat or baby capsule has to be “rock solid” to be safe and that any movement at all is a sign of poor workmanship, incorrect fitment and/or dangerous for the infant. Parents will “test” their child restraint by shaking or pushing it from side to side, and when it moves panic sets in.
A restraint that has a firm relationship to the vehicle is preferred, but this aspect is often taken way too far, with some customers ‘testing’ their fitting by shaking the restraint to prove it’s ‘safety level’. The engineering reality is that nothing that is to survive extreme forces is designed to be rigid. Everything is designed to flex. We do not catch a cricket ball with rigid arm, otherwise we would have a cricket team with multiple broken bones in their arms. The more rigidly a child restraint is attached to the chassis of the vehicle the more force the passenger will have to cope with. This is one ‘perceived benefit’ that attracts consumers to ISOFIX products, thinking that its a tighter = better fitment. Its important to note that seatbelt webbings and mountings exceed the strength of ISOFIX fittings so if your car or restraint doesn’t have ISOFIX you’re not missing out on anything in the safety department.
As long as your capsule or carseat doesn’t move more than about 1.5 cms at the belt path end (ie. where the seatbelt or isofix points are attached) then it is fine. Some movement in some circumstances is perfectly fine. Pushing, shaking or rocking the restraint does nothing and is not an adequate test of correct fitment.
All restraints under the Australian Standard are tested stringently and any restraint installed to the manufacturer’s instructions and used properly each and every trip will keep your baby safe in an accident.
If you have any questions or concerns about your restraint please don’t hesitate to contact our Restraint Fitting Team on 1300859775.