Recent Comments
No comments to show.
Posted by admin in Attachment Parenting, Babies 0-6 months, Breastfeeding, General, How to, Pregnancy on August 7th, 2021
Many women decide during pregnancy they want to breastfeed their babies when they are born. While breastfeeding is perfectly natural it still takes some getting used to and there are many (common) concerns Mums have when they begin their breastfeeding journey. Questions like “How do I know my baby is getting enough milk?”, “Will it hurt?” and “Where can I get help if I need it?” are very common themes. We’ve set out 10 tips and tricks for Mums who are planning on breastfeeding, a little guide if you like to answer the most commonly asked questions and hopefully answer any questions you may have.
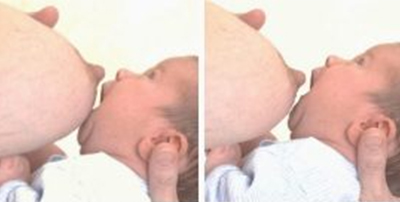

Learn the signs that your baby is getting enough milk Some good signs that your baby is getting enough milk are:
Posted by admin in Babies 0-6 months, Babies 6 months - 4 years, General, How to, Safety on November 13th, 2020
Before commencing any installation its vital that you read the manufacturer’s instruction manual in full. If you don’t have a copy most seat manufacturer’s websites have a section with downloadable manuals available for car seat users.
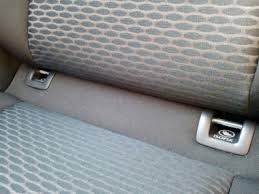
When you have read your manual head over to the car. The first thing to do is locate the ISOFIX mounting points which are usually at the bottom of the seat where the seat back meets the seat base. If the car has ISOFIX mounting points, the location may be identified by a symbol on the carseat like these:
![]()
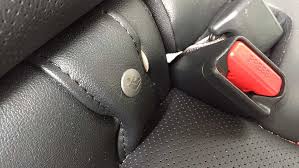
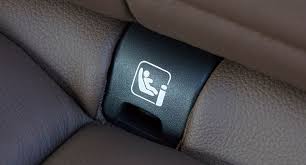
Sometimes the ISOFIX anchorage bars may be visible like this:
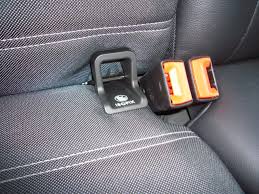
If your child restraint has rigid connectors fitted, engage each connector to the corresponding ISOFIX bar on the vehicle:
Push the child restraint towards the backrest applying a firm and even pressure on both sides. Care should be taken to ensure both sides have been engaged. This can be confirmed when the ISOFIX indicator turns from red to green.

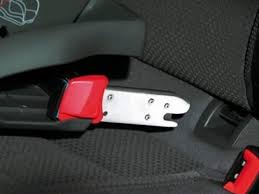
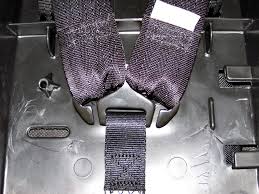
If your restraint comes with flexible ISOFIX connectors (built on seatbelt material), engage the connectors into each ISOFIX low
anchorage. A click may be felt and a green indicator will show on the top of the flexible connector when it has engaged.
Pull each strap to ensure both lower anchorage connectors are engaged and all slack is removed from either side.
All ISOFIX compatible child restraints also require the use of the top tether strap which must be attached
to the vehicle’s child restraint anchorage point, and be adjusted to remove slack. Please note the top tether strap is engaged to minimise any forward momentum in a rear end accident. It needs to be adjusted firmly but not overtensioned otherwise your restraint will lift off the car seat and feel loose when touching.
No ISOFIX? No problem
Please note if your car does not have ISOFIX available, all Australian ISOFIX compatible child restraints are also able to be installed using the car seatbelt and top tether strap, just as in non-ISOFIX compatible restraints. The rigid connectors on the child restraint can be retracted if you are installing using the car seatbelt.
Can I use a restraint purchased or manufactured overseas?
Child restraints purchased from overseas, including ISOFIX compatible child restraints, are illegal to use in
Australia as they do not comply with AS/NZS 1754. Unlike the European standard, the Australian/New Zealand Standard requires all restraints to:
AS/NZS 1754:2013 specifies child restraints Types A1/A2/A4, Type B, Type D, Type A1/B, Type A2/B, and Type A4/B are allowed to be fitted with ISOFIX attachment.
Booster seats and Type G combinations cannot use ISOFIX anchorages as there has been some concern
internationally about their likelihood for the occupant to submarine and Type G restraints are not allowed as the low anchorage may not be strong enough to withstand the crash load.
Posted by admin in Babies 0-6 months, Babies 6 months - 4 years, General, How to, Safety, Travelling with kids on November 13th, 2020
Child restraints are designed to be installed in most passenger vehicles, without requiring any additional after market fitting accessories.

Incorrect use and placement of additional comfort or fitting accessories by parents and carers can reduce the safety of the installation and should only be used if recommended by a qualified restraint fitter.
Accessories for child restraints, other than those supplied upon purchase by the manufacturer and crash tested with the restraint under either AS/NZS 1754 or AS/NZS 8005 are not recommended.
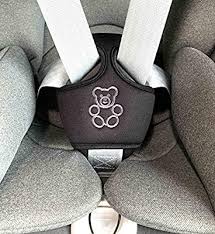
The following reasons apply to some specific accessory items that are sometimes used in conjunction with children in child restraints. None of these accessory items are recommended for a variety of reasons.
Several common designs of seatbelt positioners link the sash and lap sections of a seatbelt, raising the lap belt up into the abdomen which increases the risk of submarining and abdominal injuries. If children cannot fit well in an
adult seatbelt, they should use a booster seat with a lap-sash seatbelt.
Buckle covers and other devices to stop a child from unbuckling a restraint can impede the rapid removal of the child in the event of an emergency (e.g. after a crash). Behavioural solutions are preferred wherever possible. If you do need to utilise a buckle cover aim to buy the model simplest to remove.
Adding additional padding, pillows and cushions that surround the head or neck that are not provided by the manufacturer and tested with the restraint, may result in the inbuilt harness or seatbelt being slack and/or encourage incorrect seated posture and therefore not optimal belt positioning. Pillows behind the head might increase the risk of head injuries in side impacts by pushing the head forward and beyond the side wings of a restraint.
After market belt tensioners are generally not required for standard installations. Where they are required the restraint manufacturer will provide an appropriate accessory and include instructions on how to use the tensioner in the manual. If used with booster seats or seatbelts, they can lead to injury if over tightened and they may make the seatbelt buckle more difficult to unbuckle in the event of an emergency. When used incorrectly to install a child restraint, they may deform the restraint, reducing the restraint’s strength.
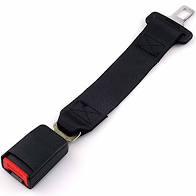
A seatbelt extender is an extra piece which goes between the male and female ends of the seatbelt and makes the belt longer and more accessible. Originally designed to be used by obese adults to allow them to buckle up where the belt would have otherwise been too short to meet and buckle up. However they are now advertised as a solution to a variety of “problems” such as making it easier to buckle a child into a booster or carseat.
Seatbelt extenders should not be used if the buckle is located in contact with the child’s body. They can introduce slack into the belt which could increase the chance of the buckle being located in front of a child’s abdomen and causing injury. They can also interfere with the correct belt path if used with a booster seat. They also require the parents or carer to check that both the extender buckle and main belt buckle are connected each time, with the possibility that one buckle can be inadvertently unsecured without the knowledge of the carer.
Rigid toys and other types of entertainment accessories may pose a risk of injury if they come in contact with the child in a
crash. Also, if not secured, rigid toys may become projectiles in a crash and injure any of the vehicle occupants. Only soft toys that contain no rigid parts should be used unsecured in a vehicle.
Designed to prevent the child from removing their arms from the inbuilt harness, pose a strangulation hazard and could injure the child’s throat or chest in a crash or the chest. Behavioural solutions to a child slipping their arms out of a harness should be employed wherever possible.
Sun shades or insect nets, which cover both the child and restraint, may prevent a parent or carer from seeing a child misusing their child restraint or in distress. Such covers may reduce air circulation and result in the overheating of children.
If you have any questions or require any assistance with your restraints feel free to reach out, our staff are always happy to help.
You’ve probably seen the shoulder height marker labels that are sewn into all new child restraints in Australia – but do you know what they are for, or how to use them?
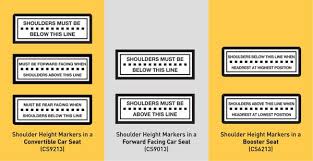
When the Australian Standard for child restraints was revised in 2010, it made significant changes to the way the suitability of a restraint was measured for a child. Previously, suitability had been determined by the weight of the child, but the 2010 standard removed all mention of weight, opting instead to add shoulder height marker labels that are sewn into the covers of all child restraints.
These new shoulder height marker labels give parents and carergivers an easy to understand, visual reference for fitment and suitability for their child, taking away the guesswork and the potential to lose track of your child’s growth in any given child restraint.
When researching restraints, it can be extremely helpful if you know your child’s seated shoulder height, so we thought we’d write a guide describing how to measure that correctly.
Your child should be in their regular clothing (if they normally wear a nappy when travelling, have them wear one now, for example).
As children’s shoulders slope downward from their necks, we recommend you measure to the middle point between their neck and the outside of their shoulder (where the shoulder strap of the child restraint harness would naturally sit).
If your child is still to young to sit up unassisted:
Understanding what the shoulder height labels mean is the key to ensuring your child is in the correct car seat for their age and height. The correct restraint is the safest option. Ignore what you think is the correct information about age, weight, abilities etc. Just follow the instructions on the shoulder height markers.
If you have any questions or comments, please get in touch.
Posted by admin in Attachment Parenting, Babies 0-6 months, Babies 6 months - 4 years, General, How to, Safety, Travelling with kids on September 22nd, 2020
Did you know that if your child’s car seat was forward facing and you were to have an accident their neck would be hit with the force of between 180kg-220kg? Whereas if they were to be rearward facing that force would reduce to 40kg-60kg?
Without exception, rearward facing is the safest way for babies and children to travel in a car. While Australian law states that children can legally move to a forward facing restraint from 6 months onwards, this legislation also states that children can be kept in rear-facing car seats until they are four years old. It is safest to have children continue to rearward face for as long as the car seat allows. The law is the minimum and a guideline only, not a rule. Lets face it – who wants to aim for the minimum safety for their child?
The choice to go with extended rear facing or switch to forward facing is a personal one that it is different for every family and every child however as professional restraint fitters we will always recommend rear facing for as long as possible.
The benefits of extended rear facing really come down to safety. If you were in a collision your child will be safer in a rear facing position. This is because of the way the car seat cushions the body in a rear facing versus forward facing position.
Rearward facing restraints are better designed to support a child’s head, neck and spine in the event of a crash. Upon impact, your child’s body is cocooned in the restraint while the forces of the collision are distributed across the shell of the seat. In a forward facing seat, a child’s head and body is thrust forward with the crash forces, and the harness is the main point of contact.
In children, this forward motion has the potential to cause serious injury as their muscles and bones are not yet developed enough to support themselves from the impact, unlike an adults body. Many parents turn their babies forward facing at 6 months old believing it’s a milestone, however it is always much safer to keep them rearward facing for as long as you can.
A video showing the difference between rear and forward facing can be viewed here:
Neuroscience Research Australia and Kidsafe recently released the National Guidelines for the Safe Restraint of Children Travelling in Motor Vehicles report, which outlined why rear facing options are safer for children up to the age of four.
“Rear facing restraints are highly effective in preventing injuries if used correctly because they fully support the child’s head and neck in the event of a crash,” the report says.
When considering when to turn your child’s seat forward facing, your child’s height is more important than their age. If your child’s shoulders do not yet reach the shoulder height markers on their car seat, then they must stay rear facing. Once their shoulders reach the upper height markers, it is time to turn the car seat around or consider an alternative restraint if you wish to continue rear facing. There are quite a lot of seats on the market that allow for extended rear facing including this range from Infa Secure: https://infasecure.com.au/collections/all-of-our-extended-rearward-facing-car-seats

Many parents worry about their child being uncomfortable or unable to find a safe position for their legs when they are rear facing. It is perfectly safe for their legs to touch the back of the seat in front. Children will find a comfortable way to sit and their legs are not at any greater risk in this position.
If you have any questions or need guidance about carseat choices or installation you can speak to one of our accredited restraint fitters by phone on 1300 859 775.
Posted by admin in Babies 0-6 months, General, How to, Safety on May 26th, 2020
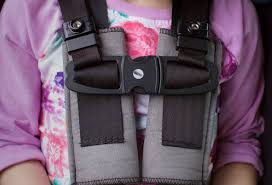
It is important to ensure you are monitoring the ongoing use of your baby capsule or carseat. As your child grows in weight and height it is important to check your baby’s shoulder height in relation to the harness straps of their restraint and, where necessary, make the necessary adjustment to the height of the harness to keep your baby safe. It is really important to ensure that the harness straps are always at or above the shoulder in rearward facing mode as there is potential for significant crash loading to be put on the child’s spine as they ramp ‘up’ the seat in the initial crash phase.
Capsules and carseats have multiple shoulder strap slots so you can move the harness up as your baby grows.
In rearward facing restraints, you should use the slot that is level or slightly above your child’s shoulders. Do not use a slot if it is below your child’s shoulders.
In forward facing restraints, you should use the closest slot to your child’s shoulders, but not more than 25mm below your child’s shoulders.
It is really important to ensure that the harness straps are always at or above the shoulder in rearward facing mode as there is potential for significant crash loading and to be put on the child’s spine as they ramp ‘up’ the seat in the initial crash phase resulting in serious spinal and other injuries.
To adjust the height of your harness, you will need to loosen the harness as much as possible and lay your restraint face down, so that the spreader / G plate becomes visible on the back of the seat. Simply unhook the ends of the harnesses from the spreader / G plate, and re-thread the straps through the appropriate slot for your child’s shoulder height. When you are finished, ensure that you’ve correctly re-attached the straps to the spreader / G plates.
A link to our instructional video demonstrating how to adjust your capsule harness is here and this makes it easy to do:
Some carseats and capsules have a feature that is built into the restraint which adjusts both the headrest and the harness simultaneously. With this feature, there is no need for rethreading or undoing the harness from the spreader / G plate at the back of the seat.
Still need some help with your carseat or capsule harness? Just give us a call on 1300 859 775 option 2 to speak to one of our accredited restraint fitters.
Posted by admin in Explore Sydney, General, How to on March 8th, 2019
Going on a family holiday? It is such an exciting time, being able to make memories with your kids and provide them with a fun few days or weeks away from home right? Well yes, the holiday itself will be exciting however as a parent who is about to go on a long drive with a car full of kids you are probably stressing, dreading and thinking why the earth did I decide to do this. Don’t stress too much, there are ways that you can make the car trip that little bit simpler on everyone.
Before piling everyone into the car, make sure that your car seats and boosters are all properly secured into their spots and are restrained. This is the most important step to ensure that everyone is safe and secure throughout the drive. When stopping for rest breaks, check the buckles before putting the kids back in to make sure that their little hands have not been playing around and unplugged anything.
When going on a road trip there is going to be a lot of packing needing to be done. Not only for the actual holiday but there is also things that you need to have packed and in reach or handy locations in the car for during the trip. Try to pack as much of the car as possible the night before to avoid having to pack the morning of the trip when you have little eager children waiting to leave. Try to pack as minimal as possible, especially if you are going to be spending a few days in the car.
The last thing you want is for the kids to be in the back of the car complaining that they are uncomfortable. This is going to make the trip seem WAY longer! Where possible equip them with little blankets and cushions to help them stay comfortable
Keeping the kids occupied throughout the trip will help save the sanity of everyone in the car. Putting together little activity packs for each child will help to keep them occupied and distracted throughout the drive. Colouring in books, reading books, figurines and dvds will help during the drive. Also don’t forget the snacks! Cut up fruit, biscuits, chips and sandwiches are all foods that are relatively low mess foods that should be okay to snack on whilst driving.
Choosing an ideal time to leave will depend on a few different things including; how far you are needing to drive, the age of your kids and the route in which you are taking. Where possible try to leave either late at night or very early in the morning if you are doing a long drive. This means that you may get a couple of hours of your little ones sleeping and will make the trip seem like it is going a lot quicker.
Travelling with kids does not need to be a stressful affair and with these few little tips you just may make it out alive ?
Happy travelling and if you have any other tips that may help feel free to share them!
Posted by admin in General, How to, Maternal Health, Pregnancy on March 8th, 2019
It is an exciting moment when you are your partner decide that it is time to start trying for a baby. Bringing a new life into the world is an amazing thing and the feelings that you start to have once you become a parent are ones you never knew were possible. For some people falling pregnant can be very quick and easy and others it may take some time to happen. There is no need to stress if it does not happen the first time you have unprotected sex, there are many factors that can contribute to why you have not fallen pregnant. There are things that you can also do to help to increase your chances of falling pregnant.

Unfortunately you can not just fall pregnant at any time, although how handy would that be! In order to fall pregnant the released egg must be fertilized by the sperm within 24 hours of being released. This means that there is a small window each month in which you can get pregnant. Your egg is typically released around 14 days before the first day of your next period which means that having intercourse a day or so before this and when the egg is being released is the ideal timing.
If you do not have a regular 28 day cycle and are unsure on when you are ovulating you can track your ovulation in a couple of ways including tracking your temperature, vaginal discharge or by purchasing an ovulation tracking kit.
Your lifestyle can play a part in falling pregnant. It is recommended to try to live a healthy lifestyle whilst trying to fall pregnant. This can include ensuring that you are getting an adequate amount of exercise, eating a healthy diet and not taking part in activities such as binge drinking and illegal drug use.
When choosing your foods for your healthy eating ensure that you are eating goods packed with food nutrients such as leafy greens, good amounts of protein and lots of fresh plant based foods. Try to avoid fatty foods and caffeinated drinks.
Exercising to keep your weight down and your body fit is a good idea however try not to take part in too many strenuous activities. Completing too much strenuous exercise can alter your periods which means that your ovulation dates can change which can then throw off your whole tracking.
When you decide that you are going to begin trying for a baby it is a good idea to start starting prenatal vitamins. These vitamins are full of goodness that will not only help you and your body but also help the progression of the pregnancy and health of the fetus once you fall pregnant. When you find out you are pregnant you are normally a few weeks in already which means that there has been time where you did not know you were pregnant, starting the vitamins whilst you are trying means that you have covered the new baby during those first few weeks
As hard as it may sound, it is best to try not too stress too much. You may be stressing about the falling pregnant or stressing about other things in your life at the time. Stress can play a lot of havoc on your mind and your body and too much stress can also lead to reduced periods or your periods becoming irregular. Maintaining a regular period means that you will be able to track your ovulation a lot easier and not be confused about when your ideal window is.
If at any point you think that there may be something wrong or you have been trying to fall pregnant for a while without success, put your mind at ease and visit your doctor. They would be happy to speak with you about what you have tried, complete testing if necessary and provide help and assistance where they can.
Remember as well, just because there is an ideal window, doesn’t mean that you can not ‘practice’ through out the month ?
Posted by admin in Attachment Parenting, Babies 0-6 months, General, How to, Pregnancy on March 8th, 2019
It is an exciting time when you are preparing for the birth of your new baby. There are so many changes that you have already gone through and so many more that are about to come. Your life will change a lot and in different ways. Not only do you need to prepare yourself but you also need to prepare your partner and family and also your home ready for the new arrival. We hope our list of tips and ideas will help you in your own preparations at home.

It is a good idea to stock up on the necessities before the birth of your little one. Buying a few weeks supply of nappies and wipes will help to reduce the need to go shopping with a newborn and reduces the risk of running out at a very inconvenient time (which of course will always be in the middle of the night with a huge poo explosion).
Also having a large supply of singlets, long onesies and short onesies means that you can reduce the number of loads of washing you need to do during those first few weeks.
If you are feeling up to it in the weeks leading up to the birth of your little one it is a good idea to spend a day making and freezing meals. This will help during those first few weeks when you are exhausted and not feeling like cooking. Ensuring that you are eating properly is important to make sure that you have energy and are able to continue functioning with your newborn. If you are breastfeeding you also need to ensure that you are getting a good amount of nutrients. There are many meals that can be prepared and frozen for eating later on.
The last thing you want to be doing the day you bring your baby home is setting up the cot or bassinet. It is a good idea to set up as much of the nursery as possible before coming home from the hospital. This way there is not that stress on you or your partner when you should be spending the time cuddling and relaxing with your new baby. Having the car seat / capsule properly installed before the birth is also important. At Rock-A-Bye Baby all our staff are Accredited Restraint Fitters and you can hire a capsule or carseat from us or we can install your own restraint for you.
The labour is one of the hardest things to prepare for as each and every labour is going to be different. If you have friends with children they have most likely told you their labour stories in a hope to help prepare you for yours. The first step of preparing for your labour is to have a plan in place. Decide the type of labour you would like to have and whether you would like to use any pain relief. Our labour TENS for hire are a good item to add to your labour toolkit if you’re hoping to have a drug free birth. When making your plan you need to be aware and okay with the fact that it may not go to plan. There are times when things change through out labour and different measures need to be taken and it may change the plan that you originally had. Remember throughout that the doctors and midwives are their for the safety of you and your baby and that if they recommend a different way of doing things it is because they feel it is going to benefit you both the best.

Before the birth of your baby, sit down with your partner and decide on how you would like the visitation to go after the birth of your baby. Whether you would like any one visiting on the day of birth and if so who. If you would prefer to wait until you get home for visitors then decide on times that suit you and your partner. These should be communicated to those around you and let them know that it is essential to call or message you beforehand to make sure that it is okay for them to be visiting.
Remember throughout all of your preparations and decisions to stop and enjoy the moments. There are some big changes coming and it is such an exciting and happy time for you and your family. Cherish each and every month and try not to stress too much. Accept help when it is offered and sleep when you can!
Posted by admin in Attachment Parenting, Breastfeeding, How to, Maternal Health, Pregnancy, Safety on September 11th, 2018
Mastitis is a painful breast condition that occurs in breastfeeding mothers and is generally the result of a blocked milk duct that hasn’t cleared or can sometimes be caused by a knock or bump to the breast. What happens is milk within the duct gets blocked up and is eventually forced into nearby breast tissue, causing the tissue to become red, hot, painful and inflamed. The inflammation is called mastitis and although infection is generally the partner of mastitis, it is not always present in every case.

Early symptoms of mastitis can give you shivers and aches, a temperature and sometimes there is red welts or streaks on the affected breast. Some mothers can get mastitis quite out of the blue with no previous duct blockage or issues.
The affected breast is generally quite sore like it is with a blocked duct, only worse. It is usually swollen and hot, and red and painful to touch and move. The skin on the breast may appear shiny and striped with red streaks. You will probably feel quite ill as if you are getting a flu and it is quite common for the ill feeling to come on very quickly.
Firstly – please see your health care professional and then start treatment as soon as you feel a lump or sore spot in your breast.
Drain the breast often – but do so gently.
This is not the time to stop breastfeeding. More than anything else, to get rid of the mastitis your breasts need to be kept as empty as possible and your baby’s feeding at the breast is the best way to do this. Your milk is not infected in any way and it is perfectly safe for your baby to drink.
When you have mastitis, it is recommended that you feed more often than usual, starting every feed on the sore breast first and let your baby suck long enough on this side to make sure that it is being drained well.
Getting rest when you have mastitis is vital to your recover. So stayin bed if you can, or at least put your feet up for most of the day. If you can go to bed for a day or two then take your baby with you and set yourself up with nappy supplies and enough food and drinks so you don’t have to get up and down. If you have other children and can’t go to bed then setting up a daybed on the couch in the living room might suit.

There are a range of things you can do to help relieve mastitis:
Tips to try and prevent mastitis occuring (or reoccuring):
Posted by admin in Babies 6 months - 4 years, General, How to, Safety, Travelling with kids on October 13th, 2017
Our goal has always been to provide our customers with the most up to date information, products and resources to empower you to make informed decisions for your families.
You may be getting ready to return your hired capsule or carseat and that means you will be doing some carseat shopping. Our guide has been put together by our Accredited Restraint Fitting Team to help you navigate the choices, options and products that are on offer and help you to choose the right seat for your child, your needs and your budget.
When we arrive at a baby shop, instinctively we will gravitate to either a label or logo we recognise, or a colour we like. However choosing the correct product for your child is much more complex than that. We have set out our top tips as well as information on available products below for you. Of course this list is not exhaustive but we have done our best to be as comprehensive as possible. As always, if you need our help we are just a phone call away.
Ensure that the seat you are considering is the right size for your child and that it meets Australian Standards and has the Australian Standards logo sticker present.
Contrary to popular belief, Australian Standards for car seats are in fact among the toughest in the world ensuring the best possible protection for our children on the road.
In Australia it is illegal to purchase or use a car seat that does not comply with the Australian/New Zealand Standard 1754 – even if you are visiting. Always look for the certification mark AS/NZS:1754 on the car seat you choose for your child.
Seats are not graded by age of children but by their size. The size of children can vary – two 4 year olds can be entirely different heights and weights so check that your childs fits within the shoulder height marker label for the specific model of car seat you are considering. Just like when you are buying jeans – you take your legs with you to ensure the product fits so take your child with you to test the restraint does in fact fit them.
Is it easy to use?
You’ll be using this seat a lot. Is it easy for you to use? When you go to the hire company or the baby shop ask them to put the restraint on your backseat in the position it will be fitted in. How easy is it for you to get your child in and out of this restraint?
Is it easy to adjust?
We also suggest you test the adjustment mechanisms on the inbuilt harness – do they loosen and tighten easily? And when its time to adjust the shoulder strap height up a new level can you do that from the front of the seat or do you have to completely uninstall it, adjust them then try and reinstall it each time?
Is it affordable?
Price is not a great indicator for quality – and that is a good thing. There is something available for most budgets on the market today. Do not feel like you are a bad parent or being cheap if you can not afford $700 for a carseat. The biggest price tag does not ensure you have the safest seat. Have a look at the CREP results. The Child Restraint Evaluation Program (CREP) is a consortium of government agencies and motorist organisations whose aim it is to provide independent and consistent information on the levels of child protection from injury in a crash provided by individual car seats and the ease with which they can be used correctly using a very simple star system with 1 out of 5 being the lowest score and 5 out of 5 the highest.
www.childcarseats.com.au
How long can you use this carseat for? Try and find a restraint with the highest shoulder height markers for ending use so you can use the seat for a long period of time. If you hope to keep your child rear facing then an extended rear facing seat with a tall shoulder height marker will be idea for you. Or maybe consider getting one of the new Type G restraints – these use the inbuilt harness up to an average 8 year old meaning you do not won’t ever have to buy a booster seat.
The road laws relating to kids and cars are minimums. We do not aim for the minimum safety – but for the maximum. So keep your child in their restraint for as long as they still fit in it. When your child reaches 6 months that does not mean its time to turn them forward facing. Just because they turn 3 you do not put them in size 3 shoes – if the seat still fits – keep using it.
Use their age as a guide only:
Newer seats nowadays all have a label on the restraint showing you exactly where the childs shoulders can be to safely use the seat. Shoulder height markers make it so easy for parents and carers to establish if a child car seat is suitable for their child and when the child needs to have the shoulder straps adjusted or when they are ready to move to the next child car seat.
Shoulder Height Markers, located on the inner side of the seat, prompt parents and carers to ensure their childs seats, and associated harnesses, are adjusted at the right stages of the childs growth to maintain optimal safety in the event of an accident.
Your child should remain in a rear facing seat or position until their shoulder is in-line or above the forward facing height marker.
Your child should remain in a forward facing seat until their shoulder height is above the upper shoulder height marker.
Note: There is a slight difference between rear and forward facing and that relates to the dynamics in the event of a collision.
We do not necessarily believe that you require professional installation of your restraint however there are a lot of belts, buckles and pathways to contend with. Before you begin, ensure you have read the instruction manual for your restraint in full and be confident that you understand how to install your seat. If you are uncertain please do not hesitate to contact us or a local restraint fitting station for advice.
Unfortunately there is a lack of understanding around the power of collision dynamics and there is an idea in the community that a car seat must be ‘rock solid’ post-fitment to be safe. This is incorrect. The Australian Standard testing procedures that these products are subjected to are stringent and demanding.
The more rigidly a restraint is attached to the vehicle chassis, the more collision force the infant will be subject to. Imagine if you will the catching arm of a cricket player. If it were completely rigid and unmoving it would shatter into pieces – exactly the same with carseats. Even the new rigid ISOFIX seats have a hinge that allow for some up and down movement to counter this possibility.
Overtensioning a restraint when installing it can cause stress damage to both the restraint and/or the vehicle seats unecessarily. A restraint that is fitted correctly does allow for some movement but no more than 2.5 cms from side to side at the belt path end of the restraint. Shaking your restraint around at the top end (where the top tether begins) is not an accurate test of correct fitment and will do nothing but loosen your restraint and perhaps leave the seat requiring refitment.
We have had customers return capsules or carseats and inform us that they didn’t use the top tether because it was annoying or took up too much time to deal with. Please – use the top tether. In an accident it serves as a very important tool to minimise the possibility of your child being injured in the crash.
When you are using the inbuilt harness ensure that the shoulder straps are:
Pinch test
Our retail arm has a selection of the latest, age appropriate current standard seats for sale including rear facing, forward facing, extended use seats and ISOFIX models. We can assist you to choose the right seat for your family. You can order and buy a seat from us and we will deliver it, pick up your hired restraint and install the new one all at the same time at no extra cost.
https://www.rockabyebabyhire.com.au/shop/category/carseats/
We hope that keeping our list of tips and information in mind will help you to make the right choice. If you have any concerns about child car seat use or how to choose please do not hesitate to contact our Team on 1300 859 775 who will be very happy to assist you.
Posted by admin in Attachment Parenting, Babies 6 months - 4 years, General, How to on July 18th, 2017

One of the most controversial topics relating to children is anything that touches on discipline or behaviour management. As someone who has been a foster carer I can say one thing with absolute certainty. Kids are not all the same and they don’t all behave or respond in the same way. You know this about your own little angels. Sleep patterns, feeding schedules, likes and dislikes vary and so do the ways in which they respond to you. What is important is choosing the right approach, with the right child at the right time. Simple, right?
One thing that almost all parents and experts agree on is that challenging behaviour, acting out, playing up or whatever you want to call it, is a form of communication and ALWAYS has a reason behind it.
When I was a child smacking was considered perfectly acceptable. Now we know better and have better techniques. These techniques not only work but reduce or even avoid the inevitable guilt we feel as parents when we discipline our children. Even that word, discipline, conjures up all sorts of dark and nasty images. In fact, the word derives from ancient Greek and means ‘to teach’. When it comes to managing behaviour that is exactly what we aim to do. Teach children how to manage strong feelings, teach them how to respond appropriately, teach them how to act or behave.
I’m sure you can relate to those situations when, for example, you implement a behaviour modifying technique on your child, that worked with them last time but now has no effect. It might be something like telling them you will take away their favourite toy for 1 hour because they are throwing their food at their older sister. You say to yourself “But that always worked before. Why isn’t it working now?”. Because the reason for the behaviour might be quite different this time. The reason behind the behaviour is more significant than the behaviour itself.
A lot of research is done on children and their behaviour. As I’m sure you know there is some controversy and conflicting advice. What seems to be a common and recurring theme is the importance of paying attention and addressing the cause of the behaviour. This is often called ‘Time In’. It’s a term that developed as response to the ‘Time Out’ behaviour management practice. In short, what the “Experts” say is that giving your child attention, talking to them, staying calm and trying to work out why they are upset or behaving badly is the best approach. Behaviour is communication and their behaviour is communicating that they are upset, sad, scared, angry, tired, etc. Reassuring, asking what’s wrong and comforting, can produce much better results, both short and long term, than punishing, placing them in ‘Time-Out’, taking away a toy or scolding.
It’s much easier said than done I know! Once I was in the supermarket the 2-year-old little boy who was currently in my care throws himself on the floor and screams and cries because I won’t put the packet of lollies he picked up in the trolley. I remembered what I was taught in my Foster Carer training and applied the ‘Time In’ principle. I stayed calm (despite the disapproving looks from other shoppers and previous advice from my grandparent’s generation) and did NOT apply the usual technique of threatening to take him straight home or take away his toy unless he stopped. Instead I picked him up, hugged him, talked calmly and asked him what was wrong. I didn’t say “no you can’t have the lollies” I just kept holding him and talking to him. After the crying stopped, he calmed down and he stopped saying he wanted lollies, I asked again what was wrong? He said “I want bunny”. He had a special toy bunny that we left in the car. He wanted it and didn’t know how to articulate that when he couldn’t see it. So we went back to the car, got bunny and then there were no more tears or demands for lollies. It really did work and I was so damn happy I was walking around the supermarket smiling. What I also did, as soon as possible is say, “now next time you feel bad like that tell me straight away so we can fix it”. That might seem too sophisticated for a 2 year old but the more you do and say it, the more they understand and it will start to prevent the behaviour in the first place.

This technique works much more than it doesn’t and has much greater results with different children with differing backgrounds and varying ages than any other technique. Believe me, I have tried them all and ‘Time In’ gets the best results. My advice is, just try it. What have you got to lose?
My name is Emma Hutton and I am the franchisee of Rock-A-Bye Baby Equipment Hire’s North and CBD branches. In a former life, I was a Specialist NICU Nurse and have also been a Foster Carer. The Foster caring, I miss and will be getting back to very soon. However, the nursing with night duty, working public holidays and having only one weekend off a month……not so much.
What has stayed with me through my career change is my passion for child safety and health. Precious and vulnerable little lives need to be protected and that is at the core of our business model at Rock-A-Bye Baby Equipment Hire. I make it my business to stay up to date with the latest research so that what I write about is relevant and factual.