Recent Comments
No comments to show.
Posted by admin in Babies 0-6 months, General, How to, Safety, Travelling with kids on June 9th, 2017
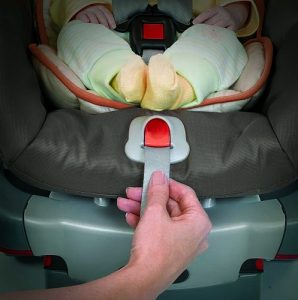
As your baby grows it is important to check and, where necessary, adjust the inbuilt harness in your hire baby seat.
Your capsule would have been provided to you on its lowest (newborn) setting with the shoulder harness on the very bottom option. Week by week, new babies put on weight and grow in length and this will mean that from time to time you will have to move the shoulder straps up a level to ensure your baby enjoys optimum safety in their hire capsule.
Harness straps that are too low for baby’s height or are twisted can be the cause of very serious injury in the event of an accident so ensuring that the shoulder harness straps are flat, firmly fitted and at the right level for your baby is vitally important.
We invite you to view our instructional video that shows how quick and simple it is to adjust the shoulder straps in your baby seat:
Posted by admin in Babies 0-6 months, Babies 6 months - 4 years, How to, Safety, Travelling with kids on May 24th, 2017
We don’t want to recite statistics at you today. Suffice to say that car crashes are real and possible and we want everyone including our little people to be safe on the road.
By choosing and using your carseat correctly you can minimise the risk of injury in the event of an accident significantly.
You’ll be using this seat a lot. Is it easy for you to use? When you go to the hire company or the baby shop ask them to put the restraint on your backseat in the position it will be fitted in. How easy is it for you to get a baby in and out of this restraint?
We also suggest you test the adjustment mechanisms on the inbuilt harness – do they loosen and tighten easily? And when its time to adjust the shoulder straps can you do that from the front of the seat or do you have to completely uninstall it, adjust them then try and reinstall it each time?
Price isn’t a great indicator for quality – and that’s a good thing. There’s something available for most budgets on the market today. Don’t feel like you’re a bad parent or being cheap if you can’t afford $700 for a carseat. The biggest price tag doesn’t ensure you have the safest seat. Have a look at the CREP results. The Child Restraint Evaluation Program (CREP) is a consortium of government agencies and motorist organisations whose aim it is to provide independent and consistent information on the levels of child protection from injury in a crash provided by individual car seats and the ease with which they can be used correctly using a very simple star system with 1 out of 5 being the lowest score and 5 out of 5 the highest. Of course if you don’t wish to buy your baby capsule we have a range of high quality, clean and safe baby capsules for hire.
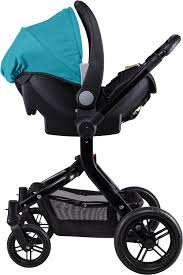
This tip relates mainly to baby capsules but gee the travel system concept is a good one! Imagine you’ve been driving around for ages and finally, finally!! the baby is asleep. Well now it would be nice to grab a coffee or do some shopping right without having to disturb the baby. So if you have a travel system compatible capsule you can just pop your capsule straight onto your pram frame and you’re off. Lots of pram companies sell adaptors to match your capsule to your pram and of course we offer a range for hire.
How long can you use this restraint for? For the early days we would recommend you consider hiring a baby capsule just for convenience, saving $ and ease of use. When you are ready to move out of your hired capsule into a carseat make sure you consider just how long this next restraint is going to be useful for. Try and find a restraint with the highest shoulder height markers for ending use so you can use the seat for a long period of time. If you hope to keep your child rear facing then an extended rear facing seat with a tall shoulder height marker will be idea for you. Or maybe consider getting one of the new Type G restraints – these use the inbuilt harness up to an average 8 year old meaning you don’t won’t ever have to buy a booster seat.
Using our tips we hope that you can get the biggest bang for your buck when it comes to buying your child car seat. Choosing the right restraint is an investment worth making.
Posted by admin in Babies 0-6 months, Babies 6 months - 4 years, Explore Sydney, How to, Safety, Travelling with kids on May 24th, 2017
There is lots of solid research both here in Australia and from overseas that shows that unfortunately, the rate of misuse of child car seats is very high.
“A 2010 study of 503 children from newborn to the age of 12 found half of all restraints had errors in how they were used. Some had up to seven errors each, ranging from failing to buckle the child in to slackness in the belts and sashes. Most often parents weren’t aware they had made a mistake.”
http://www.smh.com.au/national/health/errors-in-child-car-seat-use-putting-lives-at-risk-experts-warn-20170518-gw894a.html
When we arrive at a baby shop, instinctively we will gravitate to either a label or logo we recognise, or a colour we like. However choosing the correct product for your child is much more complex than that.
The following information is general and we strongly encourage you to read fully the instruction manual that relates to your particular make and model of child restraint.
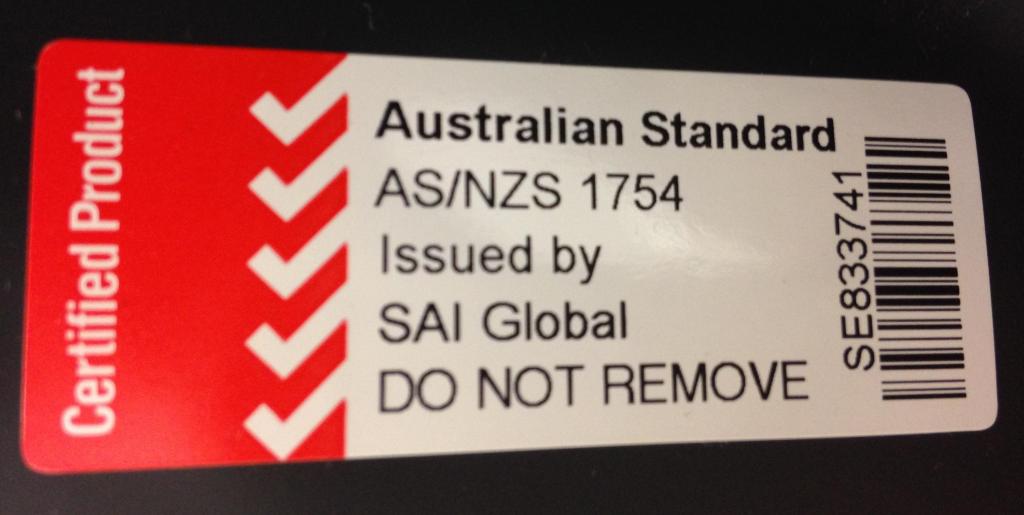
Ensure that the seat you are considering is the right size for your child and that it meets Australian Standards and has the Australian Standards logo sticker present.
Contrary to popular belief, Australia’s Standards for car seats are in fact among the toughest in the world ensuring the best possible protection for our children on the road.
In Australia it is illegal to purchase or use a car seat that does not comply with the Australian/New Zealand Standard 1754 – even if you’re visiting. Always look for the certification mark AS/NZS:1754 on the car seat you choose for your child.
Seats are not graded by age of children but by their size. The size of children can vary – two 4 year olds can be entirely different heights and weights so check that your child’s fits within the shoulder height marker label for the specific model of car seat you are considering. Just like when you’re buying jeans – you take your legs with you to ensure the product fits so take your child with you to test the restraint does in fact fit them.
The road laws relating to kids and cars are minimums. We don’t aim for the minimum safety – but for the maximum. So keep your child in their restraint for as long as they still fit in it. When your child reaches 6 months that doesn’t mean its time to turn them forward facing. Just because they turn 3 you don’t put them in size 3 shoes – if the seat still fits – keep using it.
Use their age as a guide only.
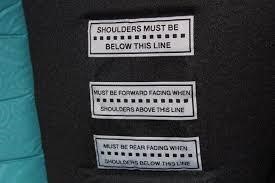
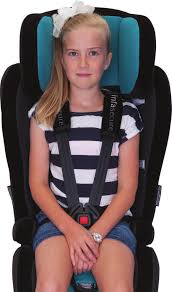
Newer seats nowadays all have a label on the restraint showing you exactly where the child’s shoulders can be to safely use the seat. Shoulder height markers make it so easy for carers to establish if a child car seat is suitable for their child and when the child needs to have the shoulder straps adjusted or when they are ready to move to the next child car seat.
Shoulder Height Markers, located on the inner side of the seat, prompt parents and carers to ensure their child’s seats, and associated harnesses, are adjusted at the right stages of the child’s growth to maintain optimal safety in the event of an accident.
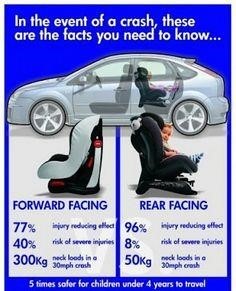
Your child should remain in a rear facing seat or position until their shoulder is in-line or above the forward facing height marker.
Your child should remain in a forward facing seat until their shoulder height is above the upper shoulder height marker.
Note: There is a slight difference between rear and forward facing and that relates to the dynamics in the event of a collision.
We don’t necessarily believe that you require professional installation of your restraint however there are a lot of belts, buckles and pathways to contend with. Before you begin, ensure you have read the instruction manual for your restraint in full and be confident that you understand how to install your seat. If you are uncertain please don’t hesitate to contact us or a local restraint fitting station for advice.
Unfortunately there is a lack of understanding around the power of collision dynamics and there is an idea in the community that a car seat must be ‘rock solid’ post-fitment to be safe. This is incorrect. The Australian Standard testing procedures that these products are subjected to are stringent and demanding.
The more rigidly a restraint is attached to the vehicle chassis, themore collision force the infant will be subject to. Imagine if you will the catching arm of a cricket player. If it were completely rigid and unmoving it would shatter into pieces – exactly the same with carseats. Even the new rigid ISOFIX seats have a hinge that allow for some up and down movement to counter this possibility.
Overtensioning a restraint when installing it can cause stress damage to both the restraint and/or the vehicle seats unecessarily. A restraint that is fitted correctly does allow for some movement but no more than 2.5 cms from side to side at the belt path end of the restraint. Shaking your restraint around at the top end (where the top tether begins) is not an accurate test of correct fitment and will do nothing but loosen your restraint and perhaps leave the seat requiring refitment.
We have had customers return capsules or carseats and inform us that they didn’t use the top tether because it was annoying or took up too much time to deal with. Please – use the top tether. In an accident it serves as a very important tool to minimise the possibility of your child being injured in the crash.
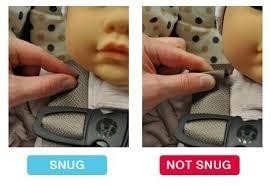
When you are using the inbuilt harness ensure that the shoulder straps are:
Keeping our list of tips in mind will help you to make a the right choice. If you have any concerns about child car seat use or how to choose please don’t hesitate to contact our Team who are well able to assist you.
Posted by admin in Babies 0-6 months, General, How to, Safety on May 8th, 2017
Bathing a newborn baby for the first time often brings out feelings of anxiety in new parents. As a former NICU/Special Care Nurse, I saw this all the time. The practice of post-natal midwives and nurses should be: show one, assist one then supervise one. Unfortunately, this doesn’t always happen for various reasons so I have a step-by-step guide as well as some dos and don’ts as a general reference. However, please make sure you follow any advice or instructions given to you by health care professionals over this information.

It is important to remember that babies needs and wants vary. Especially when it comes to things like sleep patterns, likes and dislikes. We often think babies hate baths but the fact is most of them find it relaxing and enjoyable. The part they don’t like is the undressing and then removal from the nice warm water. Once in that warm water the crying can often stop and the baby will look and feel contented. That’s why it is best to bath baby in the evening just before their evening feed then bedtime. It will take some time to work out your baby’s routines so use the evening as guide at first and choose a time when you will be less likely to have distractions.
Something I always advocate is minimal use of soaps and especially bubble bath. It might make you feel good to clean you baby with something sudsy as that is what we think cleans the best. The fact is, babies don’t need suds and their fragile skin can be made even drier because of them. You know what it’s like having dry, flaky skin and scratching, feeling uncomfortable. Imagine how uncomfortable that would feel if you were a tiny baby not capable of scratching! Also avoid scented creams and lotions. If your baby has dry skin then a little sorbolene or zinc and castor oil is very good and a lovely way to gently massage them at the same time. This is a great relaxation technique.

Posted by admin in Babies 0-6 months, Babies 6 months - 4 years, General, How to, Safety on March 20th, 2017
We do a lot of installing of carseats and capsules round here. Approximately 3 or 4 dozen a week, rising to double that during peak periods. We work very hard to ensure that our fittings always exceed the manufacturer’s instructions and do our best to teach our customers how to safely use their restraint once they leave our premises.
The one issue that seems to arise quite often is whether or not the seat is installed “tightly enough”. There is a perception in the community that a carseat or baby capsule has to be “rock solid” to be safe and that any movement at all is a sign of poor workmanship, incorrect fitment and/or dangerous for the infant. Parents will “test” their child restraint by shaking or pushing it from side to side, and when it moves panic sets in.
A restraint that has a firm relationship to the vehicle is preferred, but this aspect is often taken way too far, with some customers ‘testing’ their fitting by shaking the restraint to prove it’s ‘safety level’. The engineering reality is that nothing that is to survive extreme forces is designed to be rigid. Everything is designed to flex. We do not catch a cricket ball with rigid arm, otherwise we would have a cricket team with multiple broken bones in their arms. The more rigidly a child restraint is attached to the chassis of the vehicle the more force the passenger will have to cope with. This is one ‘perceived benefit’ that attracts consumers to ISOFIX products, thinking that its a tighter = better fitment. Its important to note that seatbelt webbings and mountings exceed the strength of ISOFIX fittings so if your car or restraint doesn’t have ISOFIX you’re not missing out on anything in the safety department.
As long as your capsule or carseat doesn’t move more than about 1.5 cms at the belt path end (ie. where the seatbelt or isofix points are attached) then it is fine. Some movement in some circumstances is perfectly fine. Pushing, shaking or rocking the restraint does nothing and is not an adequate test of correct fitment.
All restraints under the Australian Standard are tested stringently and any restraint installed to the manufacturer’s instructions and used properly each and every trip will keep your baby safe in an accident.
If you have any questions or concerns about your restraint please don’t hesitate to contact our Restraint Fitting Team on 1300859775.
Posted by admin in Babies 0-6 months, Babies 6 months - 4 years, General, How to, Safety on March 27th, 2016
There is a lot to consider when choosing a car restraint for your new baby. With all the products on offer, the shiny colourful products and the pushy salespeople it can feel overwhelming. We’re often asked what should parents look out for when buying a new car seat/capsule etc? What features are important? What safety certification should they have? Our guide to choosing the right baby carseat or capsule will hopefully help you to make the right choice.
What to look for:
A booster seat is an additional seat that sits on top of the carseat to lift the child up several centimetres to avoid them being injured in the neck area by the car seatbelt. Booster seats should be used once a child no longer fits into their forward facing restraint as indicated by the shoulder height markers (and not just because they’ve celebrated their 4th birthday). There are two types of booster seats available on the Australian market. The first is a dedicated booster seat with a back. This type of booster uses the car lap/sash seatbelt to secure the child; the other is a convertible restraint that converts from a harnessed carseat into a booster once the child reaches the appropriate shoulder height marker within the restraint.
The new Type G restraints available here to hire or brand new seats to buy have an inbuilt harness suitable for children up to about 8 years of age.
Booster cushions (the little bottom only cushions that have no back, sides, head or tether) were deleted from the 2010 Australian child restraint standard and are no longer manufactured. They are however still used and are often seen for sale on the second hand market. I would not recommend you use one of these cushions due to the fact that they offer no side or head protection at all in a collision and could leave your child vulnerable to serious injury. The decision regarding when to move your child out of a booster is one that has confused many parents.
There is, however, a very simple 5-step test that can assist you to make the right decision. Seat your child in the car without the booster and buckle them up in the car seatbelt. Now answer these 5 questions:
If you’ve answered yes to all of those questions (and your child is over 7 and has outgrown their current restraint) then your child is ok to ride in the car without a booster.
Posted by admin in Explore Sydney, General, How to, Safety, Travelling with kids on March 27th, 2016
There’s a lot to consider when you’re looking to find the perfect car for your family. How many people are you likely to be transporting each day? What size pram, bikes etc will need to be stored in your boot? Bigger is not necessarily better, its more about what space is available in the vehicle and if it will configure to suit your family’s needs today, and into the future. In a panic you might be looking at a 7 seater to ferry all your kids and their friends to sport on Saturdays, but a vehicle with a versatile interior with multiple folding seat and access options that are easy to use may be all that is required.
Here’s our checklist to help you find the perfect car for your family:

In car entertainment is quite legal for everyone except the driver (for obvious reasons!). Hearing the words “are we there yet?” on high repeat can turn a lovely Sunday drive into a teeth grinding horror movie. Many kids get bored in the car and need some distraction.
Thankfully these days, the electronica can come on the journey with you. Whether you choose handheld gaming consoles or go all out for the in-car entertainment system, you might get from A to B with barely a noise from the back seat.
Its important that safe headphones are used to avoid distracting the driver and that the children know how to activate/reactive their games or movies themselves so that the driver isn’t required to intervene and take their eyes off the road.
If you’re not a fan of devices in the car, that’s ok. There’s always eye-spy!
Posted by admin in Babies 0-6 months, General, How to, Safety on September 7th, 2015
We are often asked which of our baby capsules for hire are the lightest in weight or the smallest in size so to make it nice and easy we’ve prepared a simple comparison table for you here. The table lists all our current capsules for rent and their weight and dimensions as well as their CREP (safety) rating where that rating is available.
| Product | Capsule weight (out of base) | Product dimensions | Pram compatibility | 2nd base available for hire from Rockabye Baby Hire |
|---|---|---|---|---|
| Safety 1st One Safe Infant capsule | 3.5 kgs | H 440 mm x D 660 x W 430 | Safety 1st, Maxi Cosi | Yes |
| Babylove Snap’nGo Series BL620A/2010 | 3.8kgs | H 405 mm x D 660 x W 430 | Babylove, Valco | Yes |
| Chicco KeyFit Plus 79046 | 4.8 kgs | H: 415mm x D: 710 x W 435 | Chicco, Bugaboo, Baby Jogger, Mountain Buggy | Yes |
| Arlo Baby capsule (with or without ISOFIX) | 3.8 kgs | H: 540 mm x D: 745 x W: 460 | Arlo Stroller available for hire | Yes |
| PegPerego Primo Viaggio PP01/2010 | 5 kgs | H 430 mm x D 720 x W 440 | Peg Perego, Bugaboo, Baby Jogger, Phil & Teds, Mountain Buggy | Yes |
| Maxi-Cosi MICO AP (with or without ISOFIX) | 3.9 kgs | H 415 mm x D 760 x W 430 | Quinny, Maxi Cosi, Bugaboo (Mico only), Baby Jogger, Phil & Teds, Mamas & Papas, Icandy, Valco, Joolz, Jane Rider | Yes |
If you have other questions please don’t hesitate to contact one of our friendly staff either via email on jess@rockabyebabyhire.com.au or by telephoning 02 95894942.
Posted by admin in General, How to, Maternal Health, Safety, Travelling with kids on August 31st, 2015
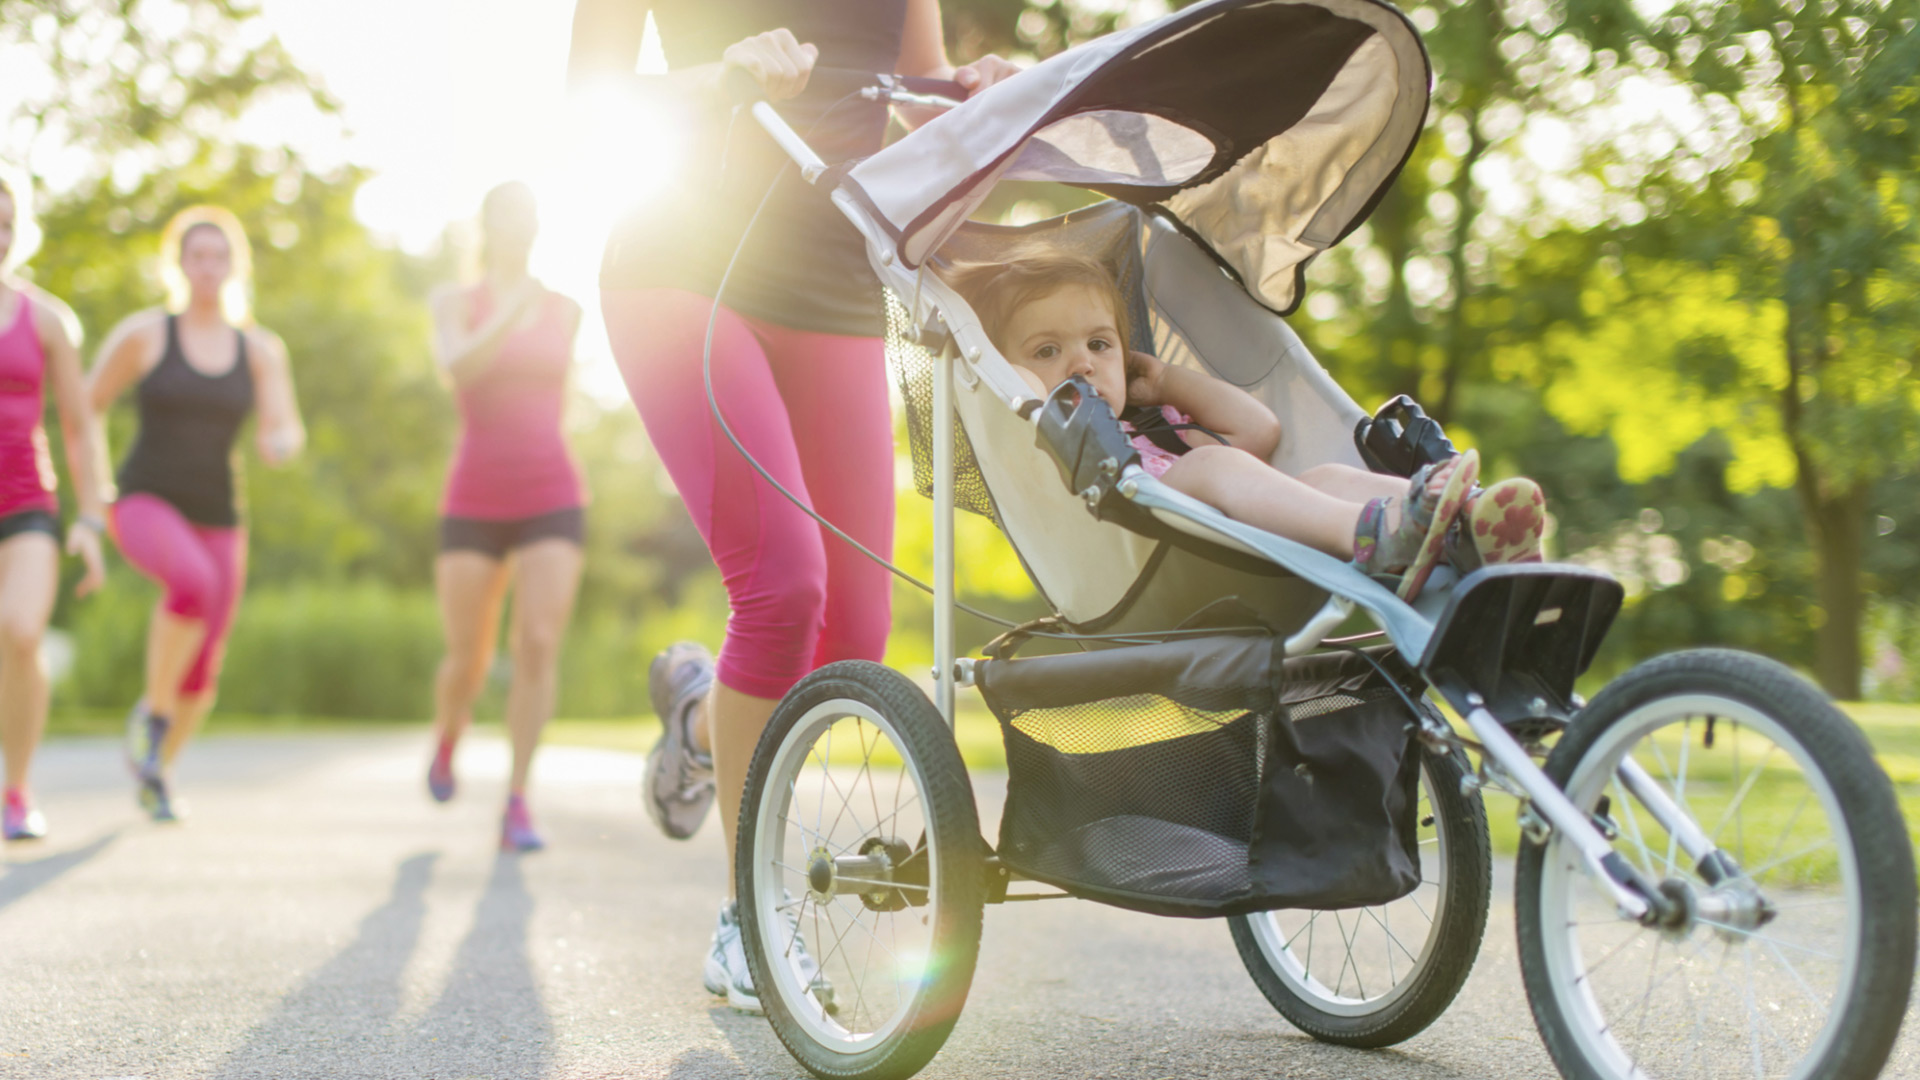
Getting back into exercise after having a baby can feel like a big ask but getting out there in the fresh air together can really benefit your mental as well as physical health. Before you start it is important to get clearance from both your own care provider and your baby’s paediatrician to confirm you’re both ready for exercise. Babies will require some time to have the necessary head and neck strength to prevent injury, as you’ll need to make sure all is well post-birth.
When you’re choosing your jogging stroller, be sure to check for features designed to keep you and your baby safe. Look for a fixed front wheel that does not swivel, which allows your stroller to continue moving straight forward as you jog, and a five-point safety harness for keeping your infant safe and stable within the pram. Check for well-inflated tires, good suspension and effective shock absorbers, as well as features like hand brakes and a wrist strap to prevent the stroller from getting away from you on hills or if you become distracted at all. If you’re not sure you might consider hiring a jogging pram to try before you buy.
Looking to hire a jogging pram for your holiday in Sydney? Click here to check out our Nipper Sport prams for hire.
Posted by admin in Attachment Parenting, Babies 6 months - 4 years, How to on July 31st, 2015
It’s always difficult to know when the best time to start toilet training for your little one. There is no specific date or time to start – it’s really up to your parental intuition and child’s physiological (bladder and bowel control), cognitive and verbal developmental stages, emotional and social awareness and their individual needs. Some kids are dry by 4 years, others are still wet at 6 – and both are perfectly normal.
Generally, most children have some control over their bladders in the daytime by the age of three and girls seem quicker to adapt than boys. At night it takes a little longer to get to grips with staying dry, as the child has no bladder awareness whilst asleep. The hormone that sends signals to the kidneys to delay urine production whilst resting develops in children at different ages, some younger and some older.
Children are either physically capable of holding their urine or waking up to wee or they aren’t. If your child is still waking up wet every morning he is not ready to be in underwear and there is no shame in that. Some kids can day train at 2 and still be in pull-ups at 5 or 6. It’s just the way they are made and every kid is different. Don’t be concerned if your toddler wets the bed because most children under the age of 5 still urinate in their sleep and one in ten younger primary school children do to.
Doctors consider bed wetting normal until about 7-8 years old. After that point they’ll sometimes check to see if there are other reasons for bed wetting (infections, diabetes, etc).
Good luck and remember, its really an individual thing not an age or maturity related milestone at all.