Recent Comments
No comments to show.
Posted by admin in Attachment Parenting, Babies 0-6 months, Babies 6 months - 4 years, How to, Safety, Sleep on July 21st, 2015
Infant sleeping bags can be a great option for babies as they eliminate the need for any extra bedding and for babies who roll around lots in bed it means they can’t get completely uncovered and cold. Sleeping bags also eliminate the need for lots of bedding which can become a suffocation risk in bed.
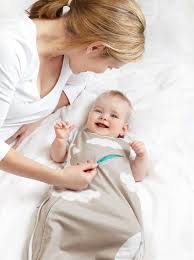
However, some baby sleeping bags on the market – particularly but not limited to those sold overseas and on online auction sites – have hoods despite hoods posing a significant safety risk to babies.
Hooded sleeping bags can potentially cover a baby’s face while they sleep, increasing the risk of suffocation significantly.
Posted by admin in Attachment Parenting, Babies 0-6 months, Babies 6 months - 4 years, How to, Sleep on July 19th, 2015
So, you’ve painted the nursery, bought the pram, set up the cot and are ready for baby to come home. Its very important to understand and follow the safe sleep guidelines to keep your baby sleeping safely day and night.
The guidelines for making up your baby’s cot have been prepared by SIDS and Kids and are a set of simple easy to follow recommendations to reduce the SIDS risk. SIDS and Kids Safe Sleeping is an evidence-based health promotion campaign developed for health professionals, childcare workers, new and expectant mothers, parents and anyone who cares for babies and infants. Since its inception in the early 1990s, the Safe Sleep campaign has reduced the incidence of Sudden Unexpected Death in Infancy by 80% saving 8,480 babies’ lives.
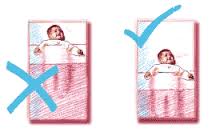
For more information on Safe Sleep please visit SIDS and Kids.
Posted by admin in Attachment Parenting, Babies 0-6 months, Babies 6 months - 4 years, Breastfeeding, General, Pregnancy on June 12th, 2015
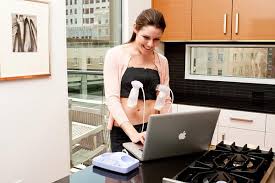
There’s many reasons why mothers might express their breastmilk to feed their babies.
Some are short term issues that need to be overcome such as having to take a medication that is incompatible with breastfeeding;
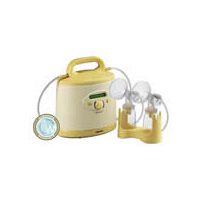
or to manage breast engorgement or allow sore or damaged nipples to heal. Sometimes using an electric breastpump such as a Medela Symphony is recommended as a way of increasing a mother’s milk supply.
For some mums expressing is a longer-term plan for managing times when you can’t physically be with your baby – perhaps you’re going back to work or study or your baby is in hospital still and you need to pump and feed that way.
For occasional short term separations (such as a weekly evening out), hand expression or a manual pump may be all you need.
But if you’re going to be expressing most of your baby’s feeds then you’d be best to consider a hospital grade breastpump like the Medela Symphony. These generally aren’t available as retail items due to their very high price tag (in the thousands) so its definately an item that you’d hire rather than buy.
Hospital grade breast pumps are extremely powerful, long-lasting, super efficient at extracting breastmilk yet very gentle and comfortable to use. Most importantly, the Medela Symphony has been designed to be able to be safely and hygienically used by multiple users.
When you hire you have a “single user sterile pumping kit” that contains all the parts that come into contact with you, your breast, your milk and your baby so hiring is quite safe.
Posted by admin in Babies 0-6 months, Babies 6 months - 4 years, General, How to, Safety on May 8th, 2015
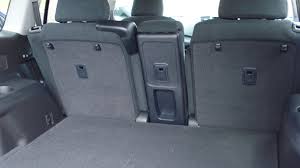
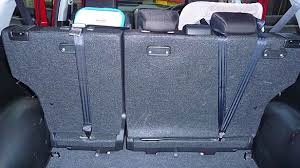
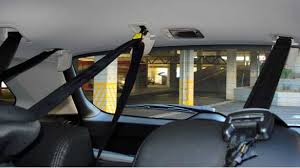
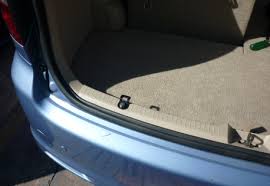
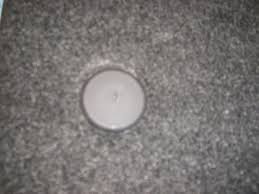
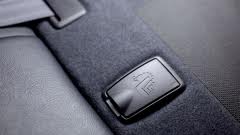
We have many calls and emails a week with people having trouble trying to find the child restraint anchor points in their car. Sometimes even we have trouble finding them when we go to do installations as there’s a fairly variable range of position, type, material and location in different cars.
Depending on the date your car was built your vehicle may or may not have anchor points already present and ready for use. It is important to note that in the rear of cars the luggage points are not confused for anchor points. This is something we see often with seats installed by well meaning relatives or friends. Unfortunately the luggage tie down points are just that – for luggage – and in an accident are not built to withstand the huge force that will be brought on it meaning the seat may not stay restrained in the car and the passenger could suffer serious injury or worse.
Sometimes you will have to actually drop the backrest of the seat forward to locate the points. If you have your car manual that will often give you the location of the restraint points to clear up any confusion between what they are and what are luggage tie down points.
Anchorage points are required to be in vehicles in accordance with the AUSTALIAN DESIGN RULE 34 (ADR34)
It is important to note that not all vehicles come fitted with an anchorage point. Some vehicles will require modifications to accommodate anchor points, while in some situations it can be illegal to install an anchorage point so it is best to refer to the owner’s manual of the vehicle or contacting the manufacturer before purchasing.
Imported vehicles require anchorage point to be established in most vehicles, prior to the vehicle being registered.
Some Dual Cabs do not have anchorage points. If required, it is possible to fit Anchorage Points to most Dual Cabs.
Some vehicles do not cater for the larger families with small children and therefore the vehicle has no 3rd row anchorage points. Again its worth checking prior to purchase.
Some images of child restraint anchor points are set out below:
Posted by admin in Attachment Parenting, Babies 0-6 months, Babies 6 months - 4 years, General, Sleep on March 18th, 2015
I remember the disturbed sleep was the hardest part about being a new Mum. I was shocked! What’s this? Broken sleep nearly broke me and I got to the point where I was exhausted. It did end, finally, when my daughter was about 12 months old and the wake ups slowed right down to just once a night and sometimes not at all.
It should be said that broken sleep and babies waking regularly during the night is completely normal.
You haven’t done anything wrong, and neither has your baby. Its normal.
It might help you to know that “sleeping through” means 5 hours of straight sleep, not 8 or 10 (sorry!).
For many parents and caregivers, even if you don’t have to get up to go to work in the morning, the question you will ask yourself more than any other may well be will this baby ever sleep through the night?
The answer is yes – sort of. The truth is, few babies truly ‘sleep through the night’ in the same way an adult does. In fact, sleep researchers have found that little people under 12 months old will normally wake up an average of three times during the night. For the first few months of life, 95% of babies will cry when they wake up and they’ll mostly want some help from you getting back to sleep. But eventually, they’ll learn to just nod back off to sleep on their own.

Several studies have found that by eight months old, over 50% of infants who wake at night go back to sleep without any attention from parents or other caregivers. In fact, sometimes their parents didn’t even realise they’d been awake.
All babies are individuals, and sleep patterns vary greatly from child to child. Even though typical sleep patterns don’t apply to all babies, researchers have identified general patterns that you can look for as your child gets older.
Sleep for newborn to six months
It might seem hard to believe when you don’t get enough sleep yourself, but wee babies sleep around 18 hours a day. It’s also ok if yours sleeps more than that, or less than that. Generally speaking little babies will sleep in batches of a few hours at a time, between 2 and 4 then wake for short periods (quick feed, change, cuddle and back off to sleep). The pattern may vary and change somewhat, and it does go on around the clock. A newborn doesn’t know that people sleep when it’s dark, and a baby’s ‘circadian rhythm’ – the 24-hour internal clock that controls our sleeping and waking patterns – is still developing.

By around six months of age, babies may have their big sleep at night and have some pattern with darkness and light. At six months, your baby will probably still wake a few times a night, and that’s ok.
Researchers using video recording in nurseries found that babies vary a lot when it comes to waking and crying – or not crying – at night. They found the biggest changes in infants’ sleeping and waking patterns happen between three and six months. Six-month-olds sleep longer at a stretch than three-month-olds. They’re also more likely to go back to sleep on their own when they wake.
There are so many wonderful changes in babies during the first 12 months. Sleep is one of them, as babies develop more adult-like sleep patterns, so hang in there. Sleep is on the way.
If you’ve never had a period of bad sleeping before, you might get a shock at just how much lack of sleep can affect your life. It’s important you still look after yourself during this time, and try to get the sleep you need to feel rested. So leave the housework, rest when your baby does, catch a lie down together when you feed and accept all offers of help from friends and family.
Posted by admin in Babies 6 months - 4 years, Safety, Travelling with kids on October 14th, 2014
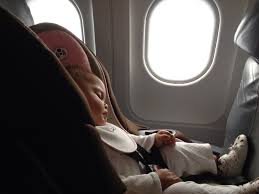
Some airlines that operate under the Civil Aviation Safety Authority (CASA) will accept child seats on their aircraft that are compliant with the Australian Standard. Currently we understand that the companies that do include Qantas, Jetstar, Virgin Blue, and the regional airlines. These airlines should accept your restraint without question although some customers have reported that they have had to have the seat to be checked before the flight for fit the day before. The width of the child restraint may be more of a concern for smaller aircraft used in regional services such as Rex etc. It is best to always check with the airline some time before you’re due to fly.
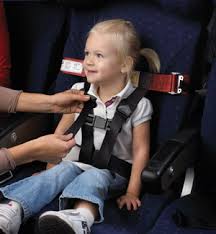
Unlike seats made in America, Australian standard restraints do not have a sticker or indicator that says “Suitable for use in aircraft” as our standard does not have this requirement. Your Airline may look for this statement as it is accepted by the USA Federal Aviation Authority, however, all airlines should accept the CASA acceptance of Australian child restraints. Sometimes however, the staff onboard the aircraft are not aware of this so again its really worth the call before you fly to check.
Please note: The tether or upper anchorage strap does not need to be attached although Qantas do have dedicated seats where child restraints can be fitted and the tether or upper anchorage strap connected to straps fitted to the aircraft. This seat must be requested on booking.
You will need to book and pay for a seat to use your child restraint when flying and this can be arranged at the time of booking or through your travel agent.
Airlines do provide an additional strap for very young children and babies and that uses the parent’s seat belt and does not require an extra seating position so if you don’t wish to take your carseat with you this is always an option, or you can hire a CARES Harness for the trip.
Some airlines do provide child restraints for use in their aircraft. Again, we suggest you check with your travel agent or with the Airline at the time of booking.
Safe travels!
Posted by admin in Babies 0-6 months, Babies 6 months - 4 years, Breastfeeding, General, How to on May 15th, 2014
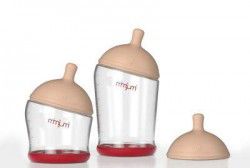
We’re really excited to have been accepted as a stockist of the MIMIJUMI BABY BOTTLES.
Developed by a comprehensive team of Mothers, Nurses, Doctors, Lactation Experts and Industrial Designers finally its here – the perfect baby bottle. With natural colours, textures and forms, Mimijumi baby bottles provide the perfect complement to breastfeeding and the best possible transition to bottle feeding. The innovative nipple design on Mimijumi baby bottles replicate a mother’s breast all the way down to pores on the skin, creating the most natural feeding and latching experience for a happier and healthier bottle fed baby.Functioning like a breast, the non-free-flow nipple design means your baby has to actually latch onto the nipple and suckle in order to produce the milk, just like they do at the breast. These elements combined replicate the breastfeeding experience and provide the most natural bottle feeding experience possible.
Mimijumi baby bottles are easy to open and clean, and are top rack dishwasher safe. Our unique integrated venting system means it is anti-colic and anti gas, and our bottles have a skid-free base for those hard one-handed refills. All Mimijumi baby bottles and parts are produced in Austria with the highest quality standards to protect your baby, and all bottles and parts are BPA Free, Latex Free, EA Free, totally toxin free and exceed all Australian safety standards. Coming in 2 sizes, The Very Hungry Baby Bottle and Not So Hungry Baby Bottle, Mimijumi baby bottles are the Next Breast Thing.
Posted by admin in Babies 6 months - 4 years, Breastfeeding, How to on April 7th, 2014

Starting your baby on solids is fun, interesting, sometimes frustrating, sometimes challenging but pretty much always messy!
Current recommendations are to start solids some time after your baby turns 6 months old. Prior to this, the baby’s digestive system is just unable to cope with other foods and their kidneys cannot process salt well. Research suggests that babies who start solids after 6 months are less likely to be intolerant or develop allergies to foods and are less likely to develop obesity and its related health concerns later in life.
Sometimes it is tempting to begin solids in the belief that this may assist your baby in sleeping through the night. It has been researched and found that babies will not automatically sleep for longer periods after being given solids (or formula for that matter).
Babies have a natural tongue-thrust reflex that means their tongue will push out against anything going in. This does disappear by about 6 months of age, enabling babies to accept and swallow solid foods.
Trying to take food from you, chewing on everything she gets her hands on, staring while you eat or appearing unsatisfied after feeds aren’t necessarily signs that your baby is ready for solids. These are all natural, developmentally appropriate behaviours that aren’t particularly related to food.
If your baby is over 6 months and does appear to be unsatisfied, even after days and nights of more frequent feedings, you may like to start considering adding solids to her diet.

Always offer the breast before solids, thus ensuring that she is getting her most important food. This will also help to avoid decreasing your supply. If you do find this is the case, you can just offer more breast, less solids for a few days to boost your supply again. Start with one “meal” per day and you can gradually build from there.
This can get pretty messy so you may like to choose where you feed wisely – if you’re not keen on scrubbing floors, its a good idea to lay down some newspaper or a plastic tablecloth to catch the inevitable spills and dribbles that will occur.
Introduce one food at a time, and space the introduction of new foods to be able to isolate reactions if they occur.
Some babies prefer to feed themselves and can be given their own spoon or if they prefer offer them finger foods they can hang onto and eat themselves.
You may at this time like to start offering a small drink of water to your baby with these meals. If your baby is still able to have as many breastfeeds as she wants, she will get sufficient fluid from your breastmilk so don’t worry if she’s not interested in water at this point.
For some babies it can be a quick transition, others are slower to taking any real interest in solids. Take your time, be guided by your baby and her appetite and try and avoid letting food become a battle.
Bon appetit!
Posted by admin in Babies 0-6 months, Babies 6 months - 4 years, How to, Safety on March 19th, 2014
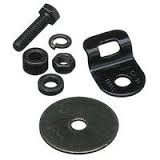
All child restraints in Australia that comply with the Australian Standard require the restraint to be fixed to the vehicle at two separate points – using the car seatbelt and a top tether which anchors to to a child restraint anchor point in the vehicle. You can install a car seat yourself, however research shows that a large proportion of restraints are incorrectly fitted, putting children at risk of serious injury and death.
A 2009 Monash study of almost 2000 car journeys involving children in restraint seats found that children had been incorrectly restrained up to 88 per cent of the time, depending on the restraint type; 88 per cent of forward-facing seats were wrongly installed, followed by infant seats (67 per cent) and booster seats (63 per cent).
The quick answer is No. It really depends on when your car was manufactured as to whether or not your vehicle has an anchor fitting point.
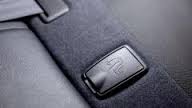
Sometimes its very easy to find an anchor point as they will have the bolt already in place and many modern vehicles have a cover over the point with this symbol identifying it as such.
Where there is no anchor bolt present there will sometimes be just a threaded hole that needs to have the anchor bolt and fitting installed. They can be located in a variety of places and could be hidden by a plug or cover. Anchor points could be located in the parcel shelf, in the back of the rear seat, in the boot floor or even in the roof behind the rear seat. If in doubt check the location of the anchor points in the vehicle’s handbook.
The anchor bolts used for child restraints are of a particular size and incorporate a thread that will not be used anywhere else in the area of the anchor points. If the anchor bolt easily screws into the point you have located, it will be the anchor point.
You will need: An anchor kit which includes the anchor bolt, washer, spacers, and anchor bracket that will be used to anchor the child restraint to the vehicle.

All the staff employed by Rockabye Baby Equipment Hire are accredited restraint fitters and we offer a professional restraint fitting service – just click here to make your booking or call us direct on 02 95994942 and we can discuss your requirements.
Posted by admin in Babies 6 months - 4 years, General on February 28th, 2014
If you’ve got relatives or friends coming to stay who have a 6-12 month old, you might be starting to worry if you have everything they need to keep baby happy and get down to the business of having a great time.
Hiring baby equipment is a fabulous, convenient way to make sure everyone feels welcome, especially bubs. So without further ado, here’s a list of must-have baby equipment that can easily be hired – and collected when you’re finished with it.
The City Select offers parents the unique opportunity to customize their stroller into 16 different combinations to suit their family needs.
*The Amby ‘Air’ Baby Hammock* The last thing you want is a sleep-deprived Mum or Dad on your hosting hands. Someone’s got to help with the washing up! They won’t be much good to you if they’re nodding off in their Christmas pudding. That’s where the *Amby “Air” Baby Hammock* comes into its own!
*Stokke ‘Sleepi’ Cot* The Stokke range is among the most coveted nursery item in Rock-A-Bye-Baby’s range. The *Stokke Sleepi* cot’s distinctive, narrow oval shape creates the ideal nest for bubba, and increases airflow. It’s soft, safe, cosy and oh so comfy. Parents can adjust the height so they’re not straining their backs when settling and rousing baby, and the cot can even be wheeled around the house – anything to make life a little easier!
Sleepi is constructed of 100% solid cultivated beech wood, a material known for its strength and stability. Choose from a range of great colours and wood finishes. All varnishes are non-toxic and safe for baby.
*Change Table* You really don’t want to end up changing nappies on a bed or the floor unless there’s no alternative. The super-fast set up and easy-clean surface make this a great *change table* for home or holidays.
Hyperlinks below: they are listed by the name of the product/product section they need to be inserted into, text to be used for hyperlink is in bold and bracketed with asterisks, *like this*, formatting to be removed when hyperlink inserted. NOTE when RABB new site design is completed, product hyperlinks may need to be swapped for new RABB internal site links:
Posted by admin in Babies 0-6 months, Babies 6 months - 4 years, How to on February 21st, 2014
Ah the joys of watching your baby master new skills. I remember very well how excited I was to introduce solids to my little girl and watching her eat a mix of raw avocado and greek yoghurt pleased me no end. She still doesn’t believe me that she really did love to eat those two together.
Without stating the obvious, babies learning to eat is a very messy business. We always had a bunch of $2 shop shower curtains when my little one was small that I threw down under the highchair to save having to wash the floor after every meal where what seemed like 50% of the food would end up flung on the floor.
Some highchairs like our Stokke Tripp Trapps are very easy to clean, others have a nice puffy cushiony cover which can have tiny little folds and corners and hidey-holes where food hides and is very hard to get out. You’ll be using your highchair for quite a bit of time so cleaning it is a job everyone is faced with at some point. Here’s our guide on how to clean your highchair – hope it helps.
NOTE: Doing this outside in your yard or a space where water splashing on the floor doesn’t matter is a good idea.
Posted by admin in Babies 0-6 months, Babies 6 months - 4 years, General, Safety on February 19th, 2014
By law, babies can legally face forward in the car from 6 months of age and baby capsules are generally used to 6 months of age, so many parents presume that baby can go straight to a forward facing carseat once they turn 6 months old. But is this really the safest option?
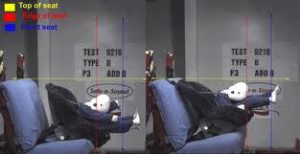
Safe N Sound crash testing
According to Kidsafe Australia, more children die from injuries sustained by or in motor vehicles than from cancer and diseases of the nervous system combined.
Many parents turn their babies forward-facing at 6 months because the law says they can, unaware that this could put their baby at risk of serious neck, head and internal injuries in a collision. In a front-on collision, your baby’s head will snap forward abruptly which can cause considerable, sometimes permanent damage to their spine. It is not just a matter of head strength. Just because your baby holds their head up well doesn’t mean they are strong enough not to suffer this kind of injury.
Babies aren’t small adults and they’re not built the same way as an adult so the risk of serious injury in a car crash when they are forward facing is very real. Babies have surprisingly heavy heads in relation to their bodies: the average nine month old child’s head makes up 25% of his body weight, while an adult’s head only makes up 6% of its body weight. In a forward facing accident the body is restrained by the inbuilt harness, but your baby’s head is not so the force of the accident will snap their head and neck forward quite sharply, even in a minor accident.
To see the difference in an accident between rear and forward facing you might like to watch this video:
Rear -v- forward facing video
We suggest to our customers that they guided by the baby’s weight rather than his or her age. If your child is six months old but only weighs 8.5kg, he or she can and should stay in their rear-facing restraint until she weighs enough to move to the next stage seat. There are many affordable products on the market today that will allow the average child to rear face beyond 6 months old.
When considering whether to move your baby to a forward facing restraint, it’s important to consider safety but also the needs of your family. Some parents report that their babies are very unhappy in the rear-facing position and this does need to be taken into account if its so distracting you can’t drive!